To connect Okta with your Kiro Profile, you need to:
- Create an OIDC Okta application
- Create a SAML Okta application
- Set up custom scopes for OIDC application
- Set up Kiro Profile
Why two applications
When using Okta, you need to create two applications: one for OIDC and one for SAML. This is because in Okta, OIDC application does not support SCIM, but SAML application does. So Kiro will use the SAML application to synchronize users and groups and the OIDC application for users to login.
Step 1: Create OIDC application
Create new app integration
In the Okta Admin Console, navigate to the Applications -> Applications section and select "Create App integration". Select "OIDC - OpenID Connect" for "Sign-in method", and "Native Application" as the Application type.
Loading image...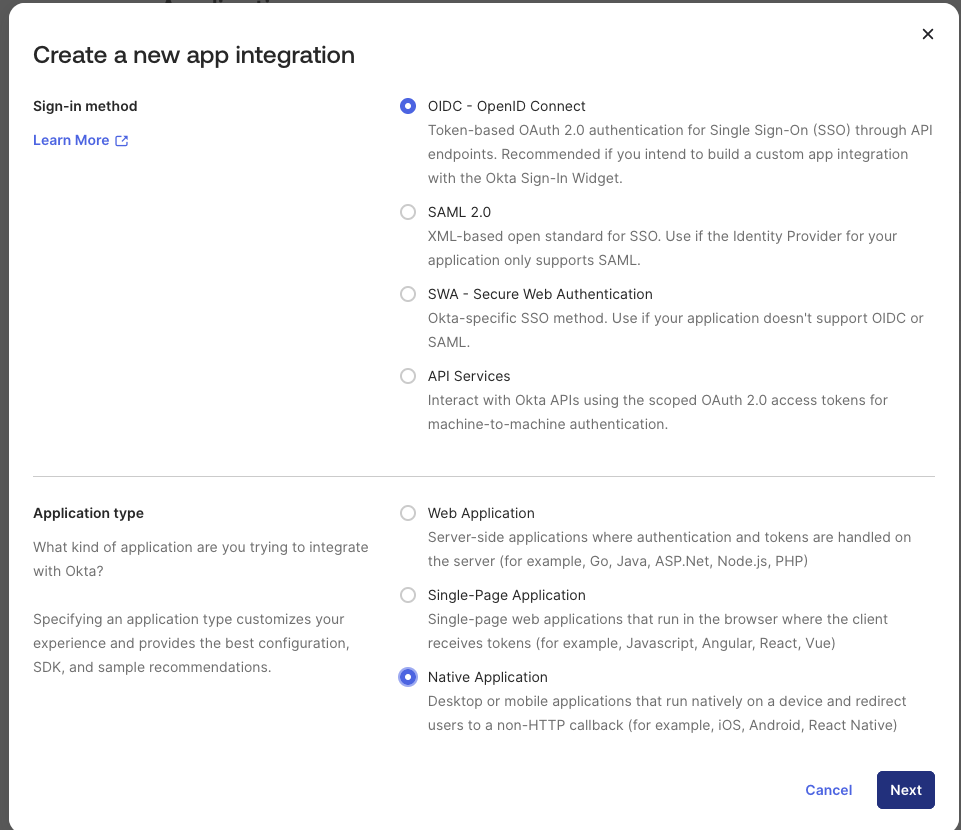
Provide a descriptive name, example Kiro-OIDC, for your application and check the "Refresh Token" checkbox in the "Grant type" field. Leave the default values for all other fields.
First, add kiro://kiro.oauth/callback as a Sign-in redirect URI. This is one of the URIs that Kiro clients will listen to when Okta returns the user after they successfully sign in with Okta.
Next, add 10 additional entries as Sign-in redirect URIs in the following format: http://localhost:{port-number}/oauth/callback, where the port-number is one of the following port numbers - 3128, 4649, 6588, 8008, 9091, 49153, 50153, 51153, 52153 and 53153.
Example:
Loading image...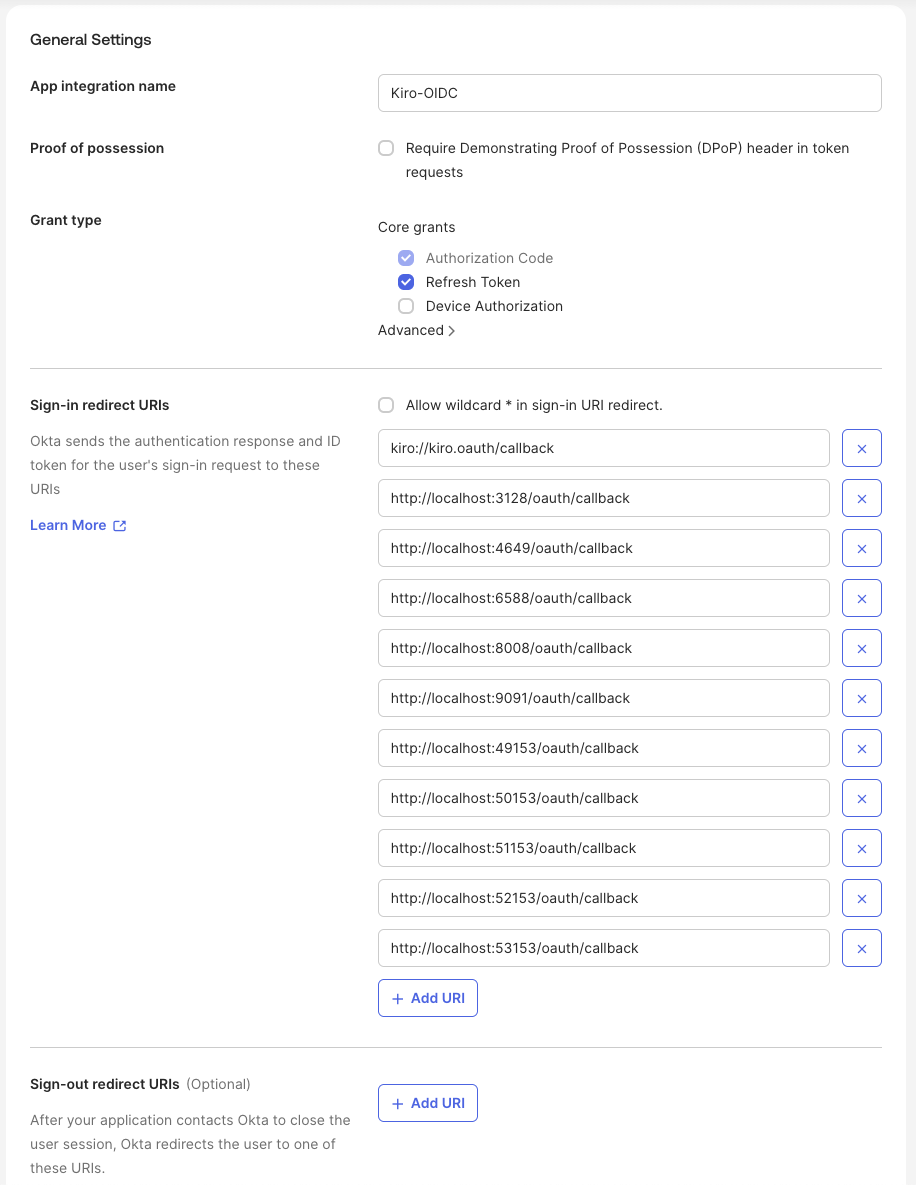
Ensure that "Skip group assignment for now" is selected and select "Save" to complete creating the application. This will show the details of the newly created application.
Loading image...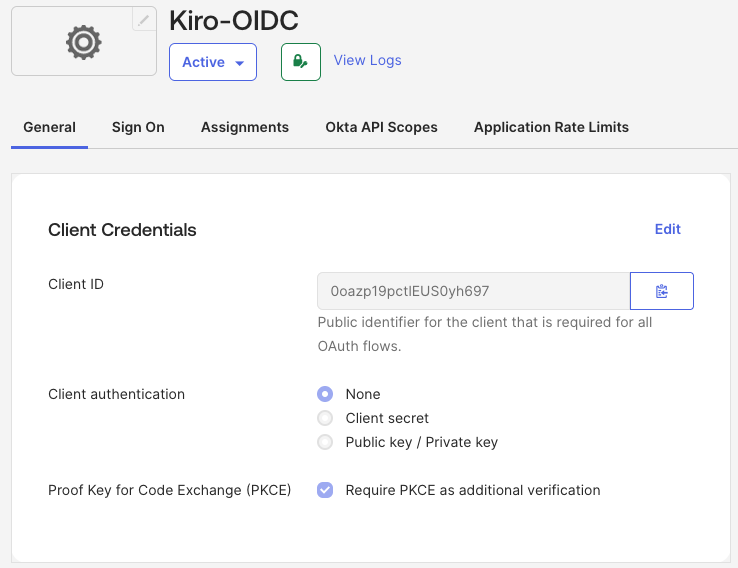
Add users and groups
Next, you will add the users and groups that will be part of the application. Select the "Assignments" tab. Select the "Assign" button and follow the instructions to add users and groups that should have access to Kiro.
Loading image...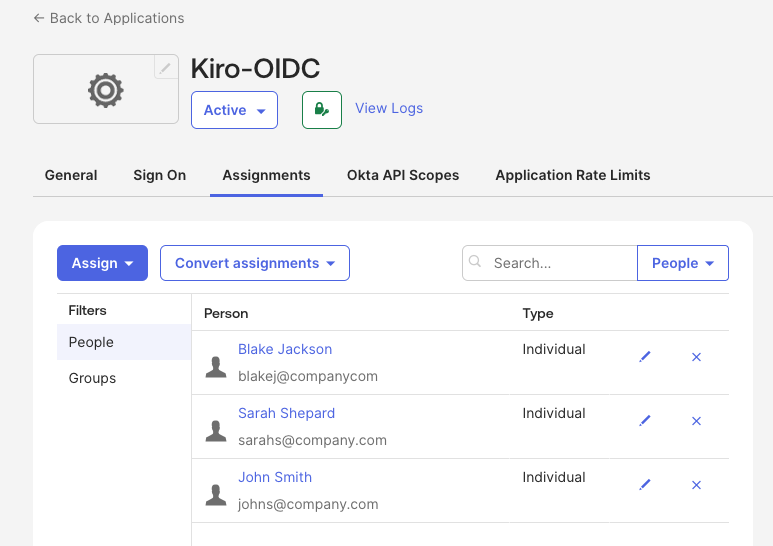
You have completed creating the OIDC application.
Step 2: Create SAML application
Create app integration
Next, you have to create the SAML application and configure users and groups. In the Okta Admin Console, navigate to the Applications -> Applications section and select "Create App integration". Select "SAML 2.0" for "Sign-in method" and select "Next".
Loading image...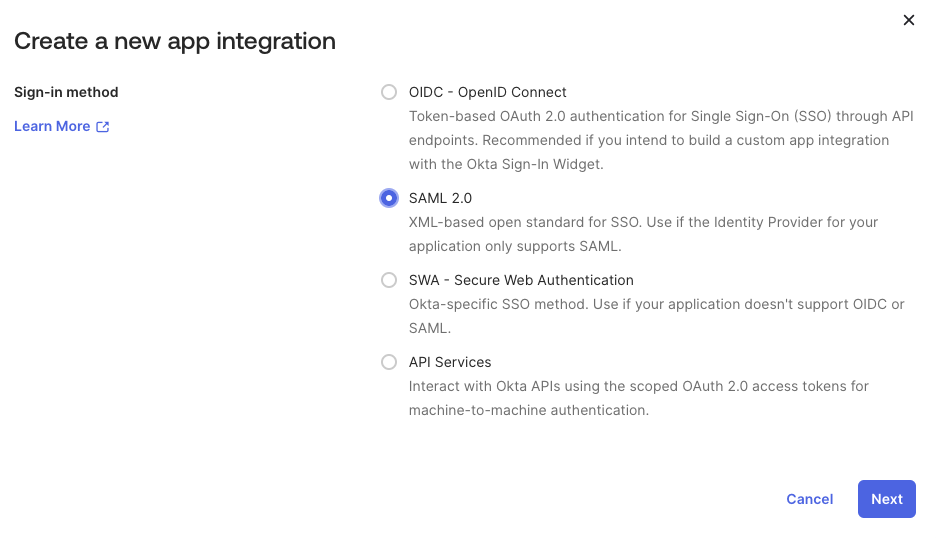
Set a descriptive name for the application in the "General Settings" section, for example Kiro-SAML, and select "Next".
Loading image...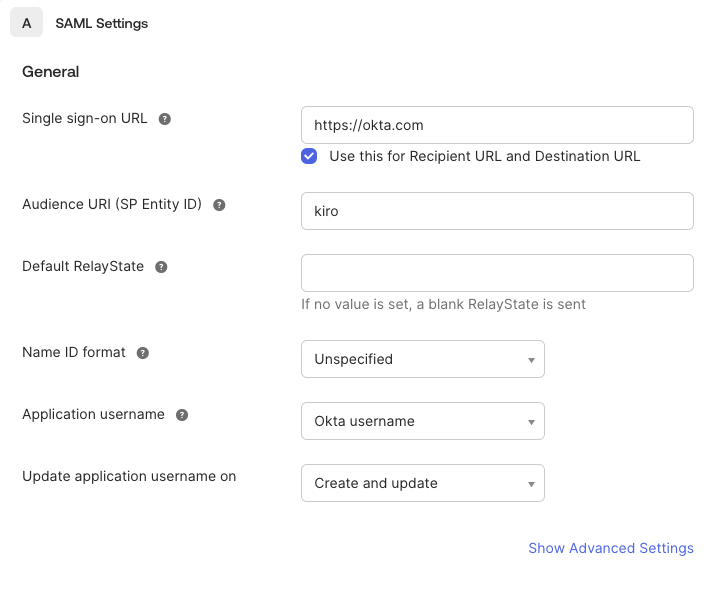
In the "SAML Settings" page, "Single sign-on URL" and "Audience URI" are required fields. Since Kiro uses the OIDC application for user login, these attributes are not used, but required for configuration. The Single sign-in URL needs to be a URL format, for example https://okta.com, and the "Audience URI" can be anything, for example kiro. Select "Next".
Next, in the "Help Okta Support section", choose the appropriate value for how you want Okta support to assist and select "Finish" to complete the setup.
Configure provisioning
Lastly, you have to configure the provisioning format. Select the "General" tab, navigate to the "App Settings" section and select "Edit". Set "SCIM" as the "Provisioning" type (this option is only visible after selecting "Edit") and select "Save" to complete setting up the SAML application.
Loading image...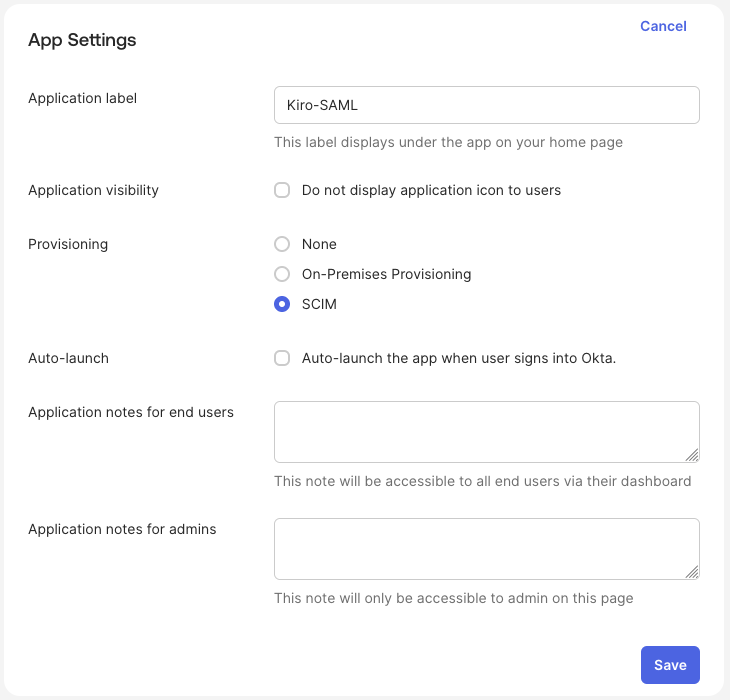
Step 3: Set up custom scopes
Create Kiro specific scopes
Now that both applications have been created, you have to set up the scopes to allow user identities to present the right authorization to access Kiro. You will set up two scopes - completions and conversations.
Scope authorization
- codewhisperer:completions — Authorizes the user to access the inline code completion feature in Kiro.
- codewhisperer:conversations — Authorizes the user to access the chat and conversation feature in Kiro.
Only grant the scopes that your organization requires. You should understand the impact of each scope when configuring access policies.
In the Okta Admin console, navigate to the Security -> API section. In the "Authorization Servers" tab, select "Add Authorization Server" button.
Loading image...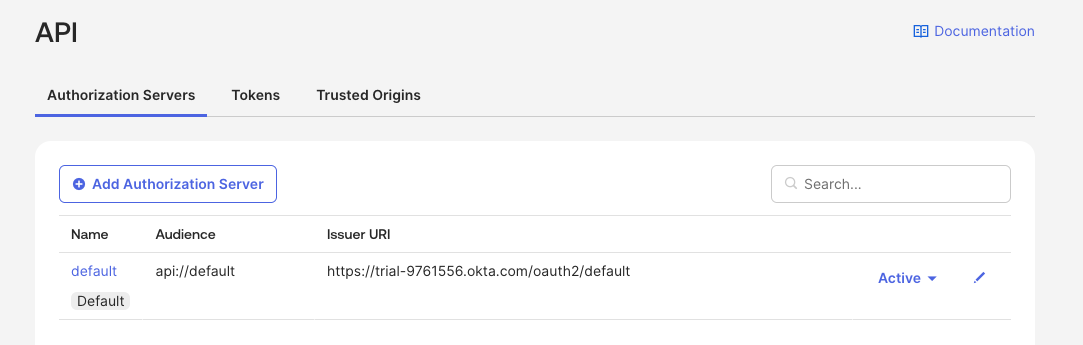
Enter a name and description for the Authorization Server.
Loading image...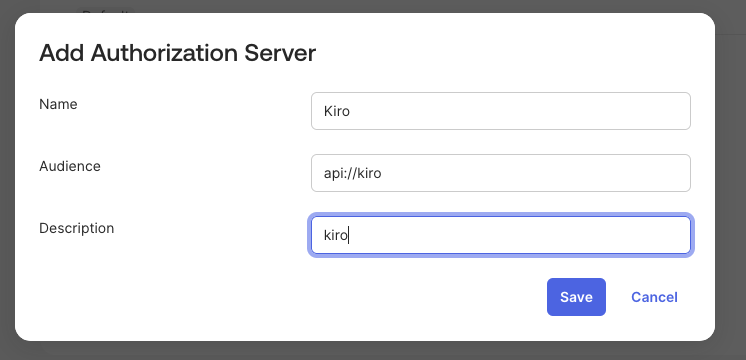
Select "Save" to complete adding the server.
Loading image...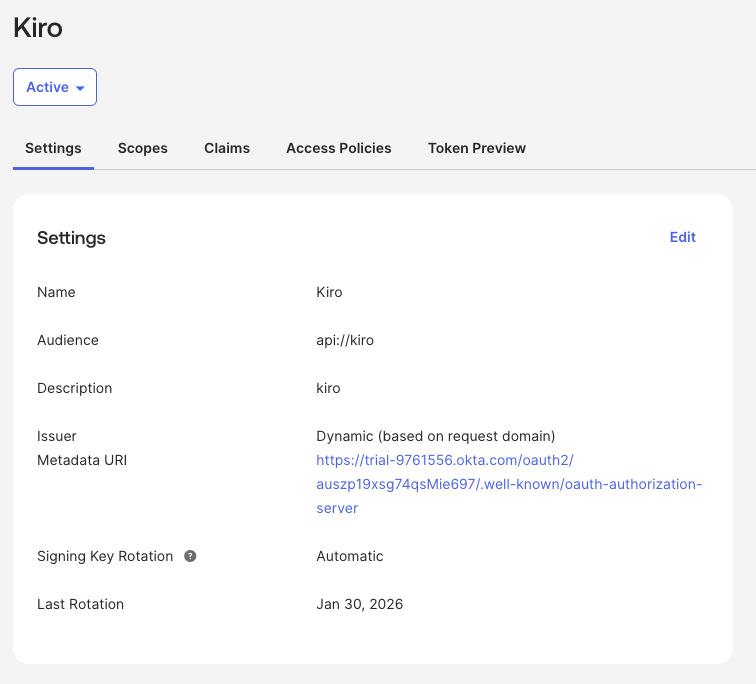
Select the "Scopes" tab and select the "Add Scope" button to add a scope that authorizes user identities to access a Kiro feature.
First, add a scope for codewhisperer:completions with "User content" value set to "Implicit". Leave all other fields as default. Select "Create" to add the scope.
Loading image...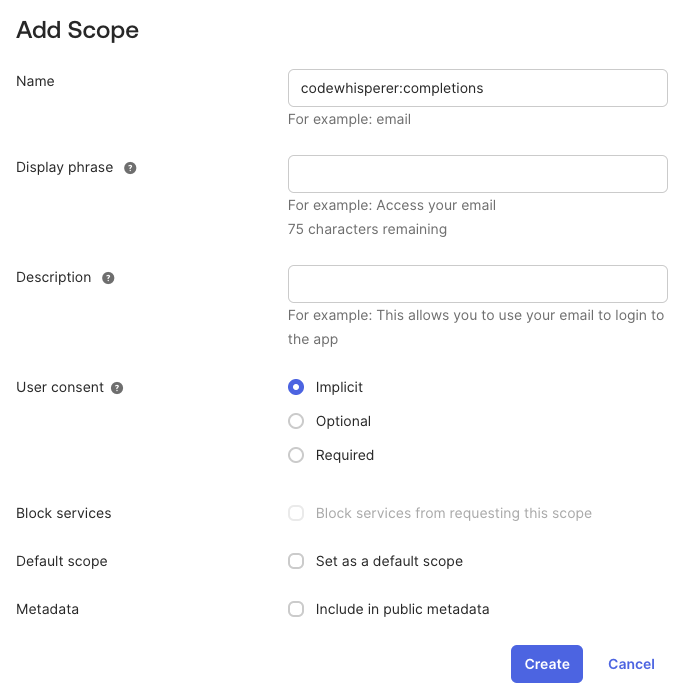
Follow the same steps to add a scope for codewhisperer:conversations.
Add access policies
Next, you have to add access policies and rules to the Authorization Server to control what Kiro can access through the Kiro OIDC application.
Select the "Access Policies" tab and select the "Add Policy" button.
Loading image...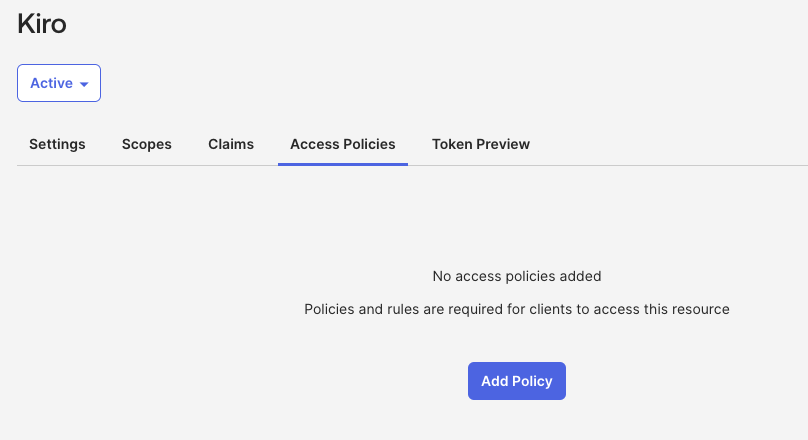
Set a descriptive name for the policy and assign the policy to the Kiro OIDC application you created - Kiro-OIDC.
Loading image...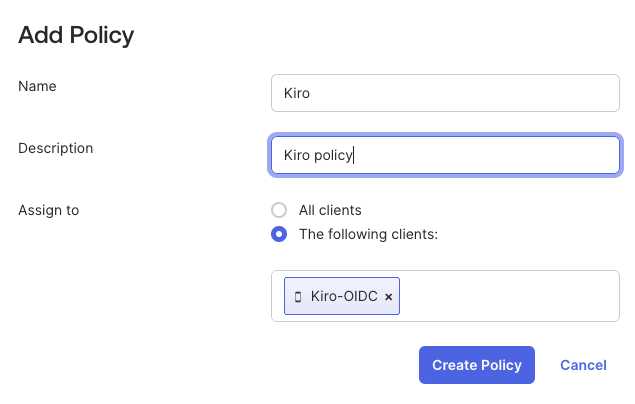
After the policy is created, select "Add rule" for the newly created policy.
Loading image...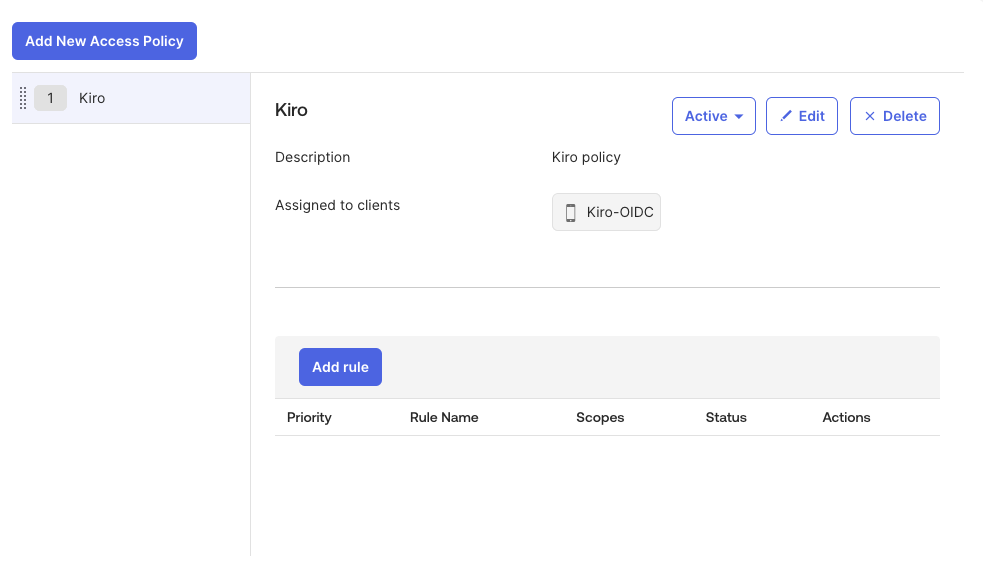
Leave the default values for all the fields except for "Scopes requested". Select "The following scopes:" option and add the "codewhisperer:completions", "codewhisperer:conversations" and "offline_access" scopes. Select "Create rule" to complete adding the rule.
Loading image...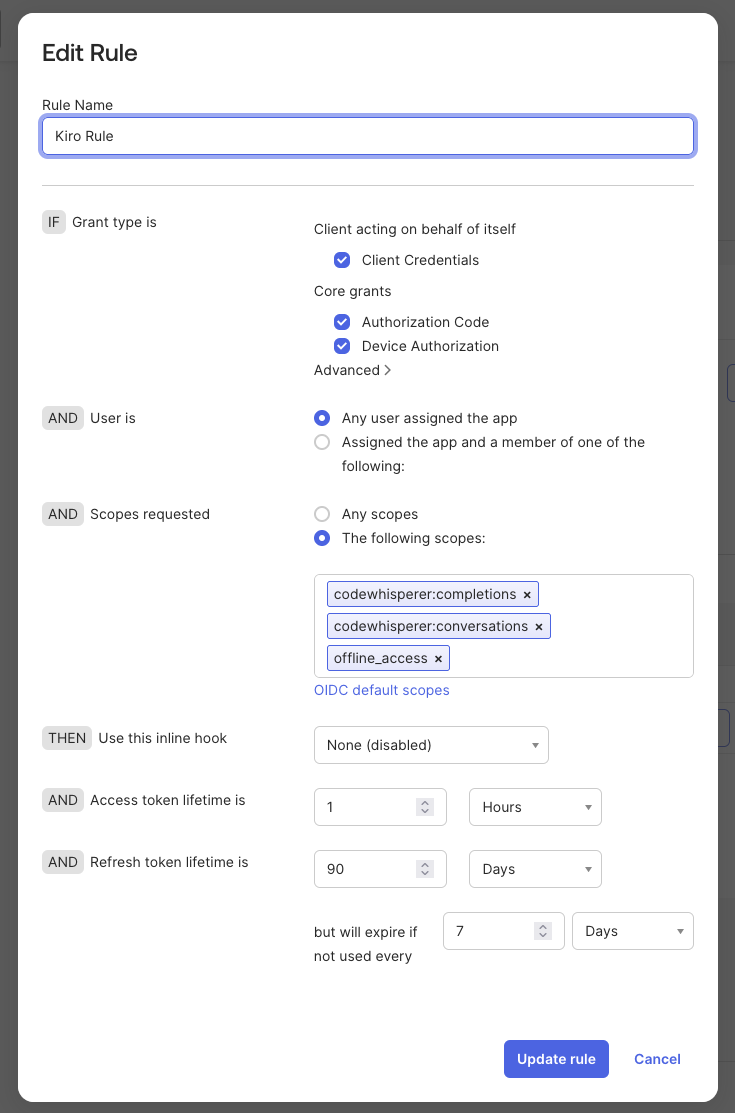
Lastly, test the configuration. To test, select the "Token Preview" tab. Select the OIDC application you created for Kiro (ex: Kiro-OIDC) in the "OAuth/OIDC client" field, select "Authorization Code" as the "Grant type", and select the two codewhisperer scopes, and "offline_access" in the "Scopes" field. Select the "Preview Token" button and if the configuration is valid, the Payload section in the "Preview" panel will contain a "iss" attribute with value, and the "scp" attribute will contain the three scopes you selected.
Loading image...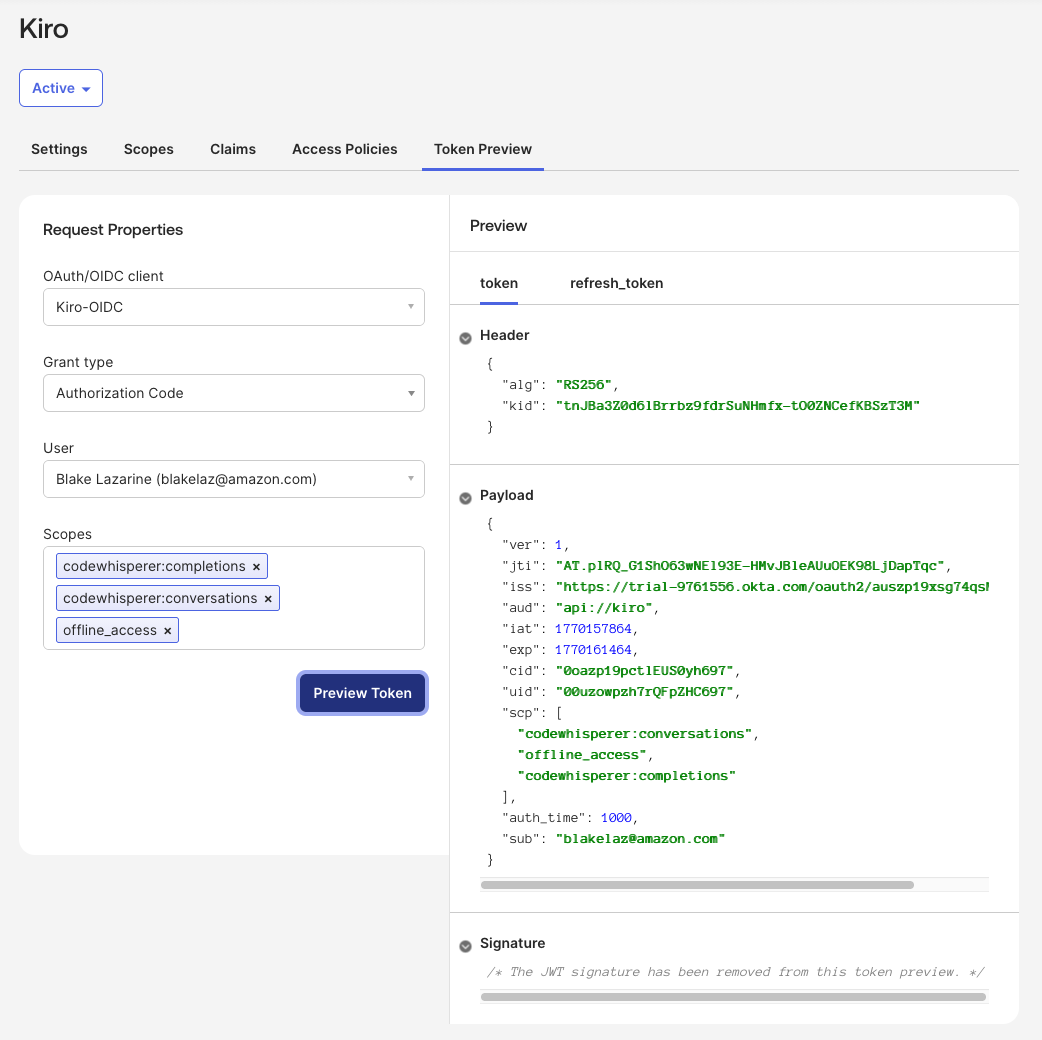
You have completed all the steps required to configure the applications in Okta. Now you can create the Kiro Profile and subscribe your users and groups.
Step 4: Set up Kiro Profile
Create Kiro Profile
In the Kiro console, select "Sign up for Kiro" and select "Set up application as Admin". Select the "Connect an existing external Identity provider" option.
Loading image...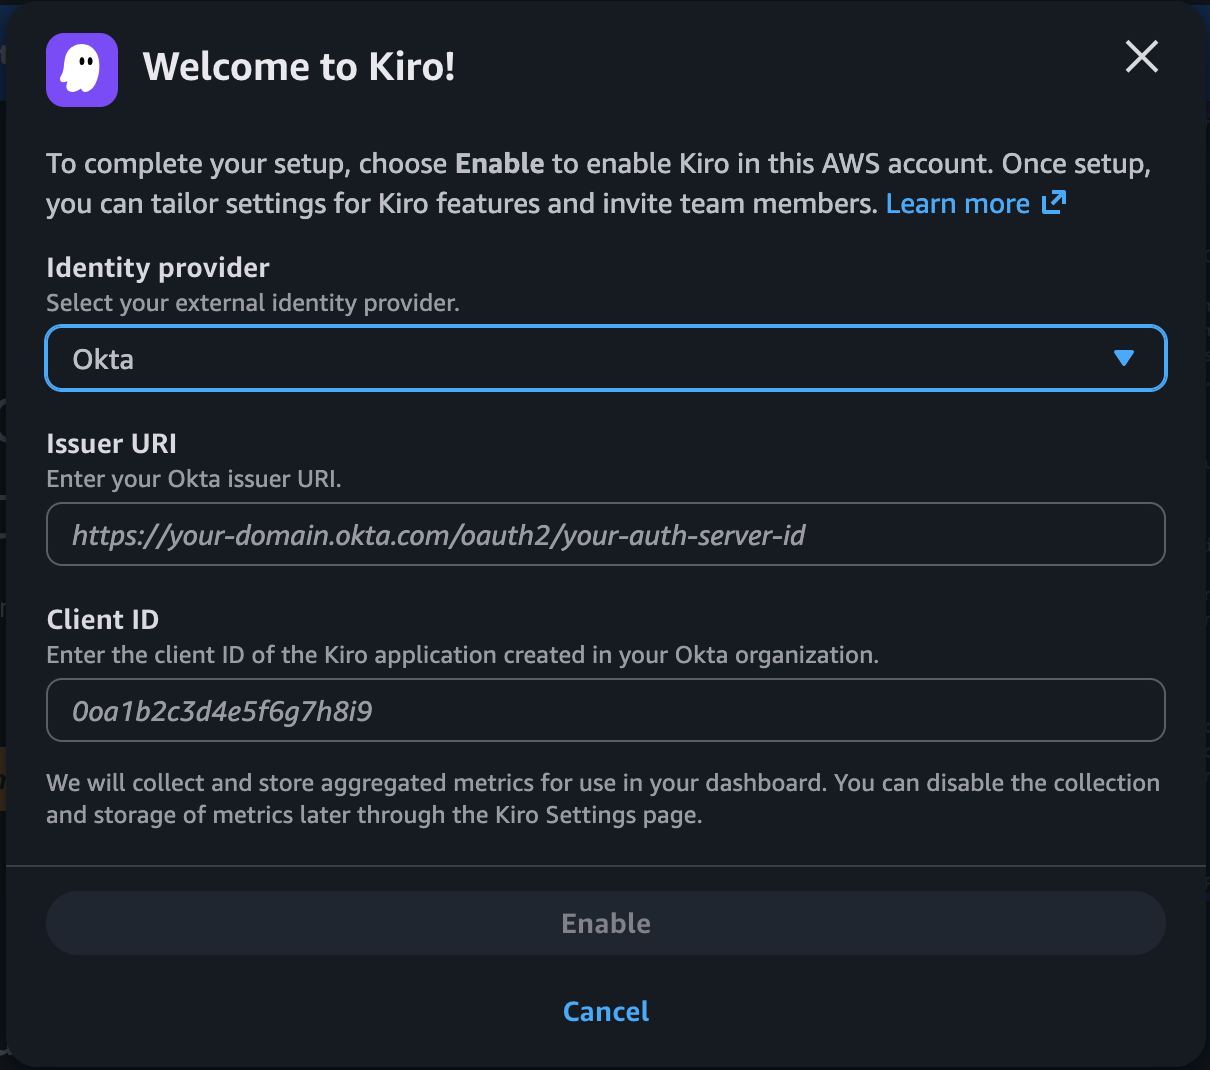
From the Okta Admin Console, navigate to Security -> API section and select the Authorization Server that you created for Kiro.
Loading image...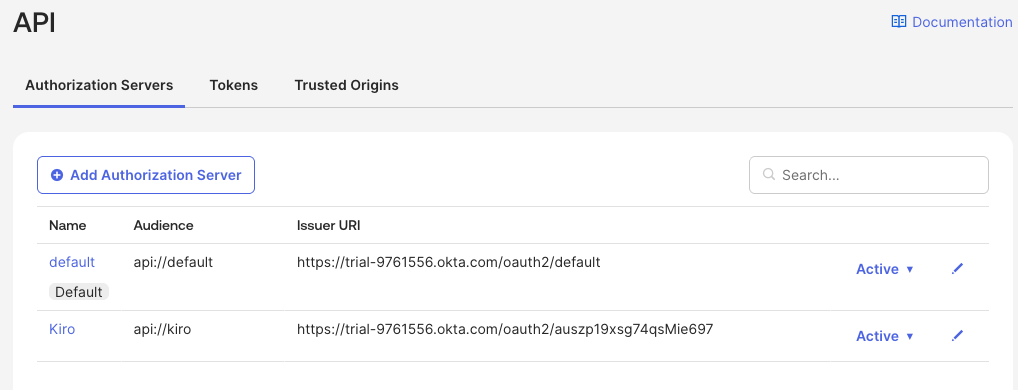
Copy the Issuer URI value for the application you just set up and paste it in the Issuer URI field of the Kiro Profile.
In the Okta Admin Console, navigate to the Applications section, and open the OIDC application that you created for Kiro integration, for example Kiro-OIDC. Copy the Client ID value and paste it in the Client ID field of the Kiro Profile.
Loading image...
Select "Enable" to complete creating the Kiro Profile.
Add and verify domain
In the Kiro console, select the "Settings" button and in the Identity management -> Domains section, select "Add domain" to add your company domain
Loading image...
Selecting "Add" will add the domain and show you a verification token. Copy the verification token. The domain added will show up in the Domains list with "Pending" status.
In your DNS Provider like Amazon Route53, create TXT record with that verification token.
Loading image...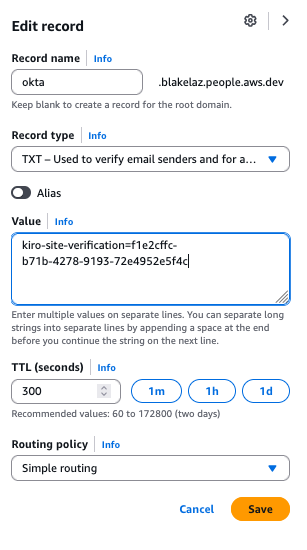
If the configuration is valid, after a few minutes the status will be "Verified".
Loading image...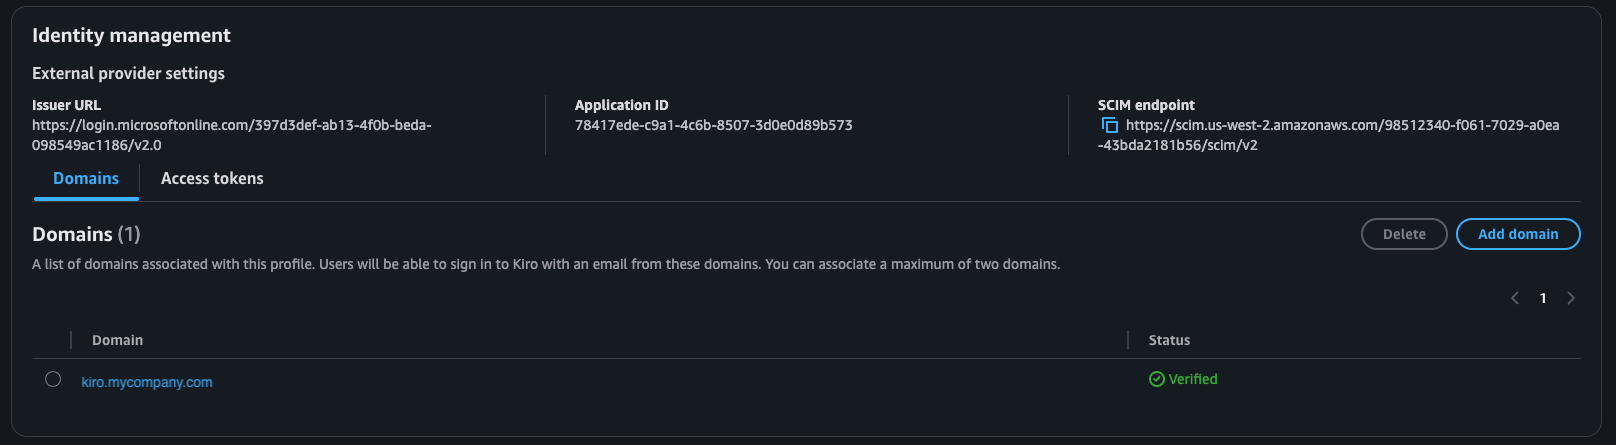
Provision the SAML application
In this step, you will provision the Kiro application and verify that Kiro can sync identities from your Okta identity store.
In the Okta Admin console, navigate to Applications section and select the SAML application ("Kiro-SAML") you created for Kiro. Select the "Provisioning" tab
Select "Edit" in the "SCIM Connection" section.
Loading image...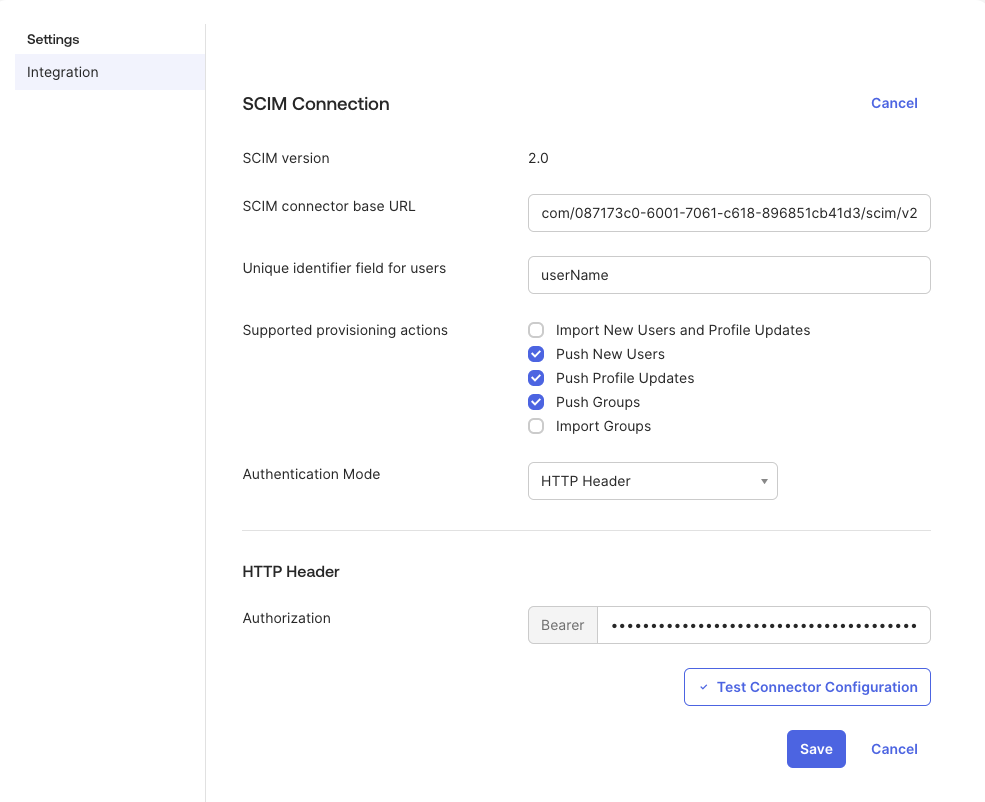
From the Settings page of the Kiro profile in the Kiro console, copy the value in "SCIM Endpoint" from the "Identity management" section. Paste that in the "SCIM connector based URL" field in the SCIM Connection section in Okta.
Set the "Unique identifier field for users" to userName. This indicates that the userName field is the unique identifier for users. Check Push New Users, Push Profile Updates, and Push Groups under "Supported provisioning actions".
Set the "Authentication Mode" to HTTP Header.
In the Kiro console, navigate to Settings -> Identity Management -> Access Tokens section. Select "Generate Token" to generate an access token. Copy the access token and paste it in the "Authorization" field in the HTTP Header section.
Loading image...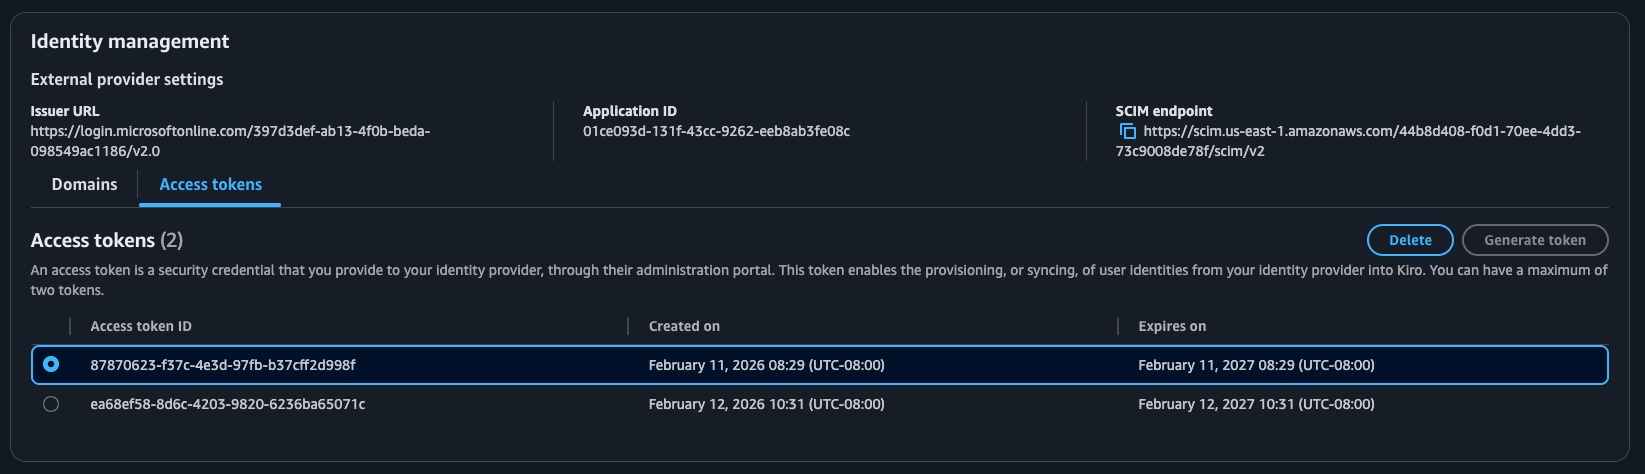
Now, you can test the SCIM connection. You should see that the connector was configured successfully.
Loading image...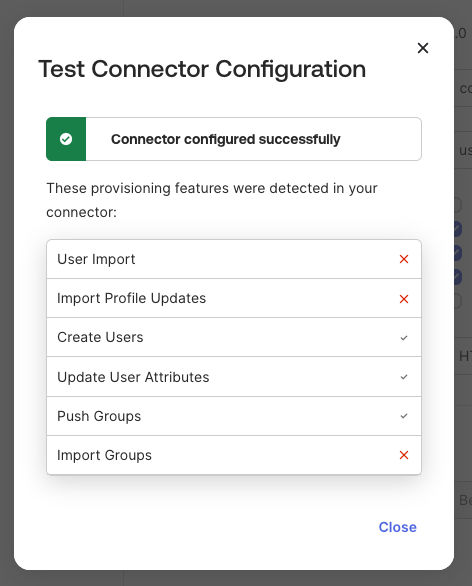
Select "Save". This will show two new options in the sidebar - "To App" and "To Okta". With this, you have set up the secure synchronization of identities to Kiro from Okta.
Select the "To App" option to provision from Okta to Kiro. Click "Edit", enable "Create Users" and "Update User Attributes" and select "Save".
Next, navigate to the "Assignments" tab and assign the same users and groups that you add in the Kiro OIDC application (ex: Kiro-OIDC).
Loading image...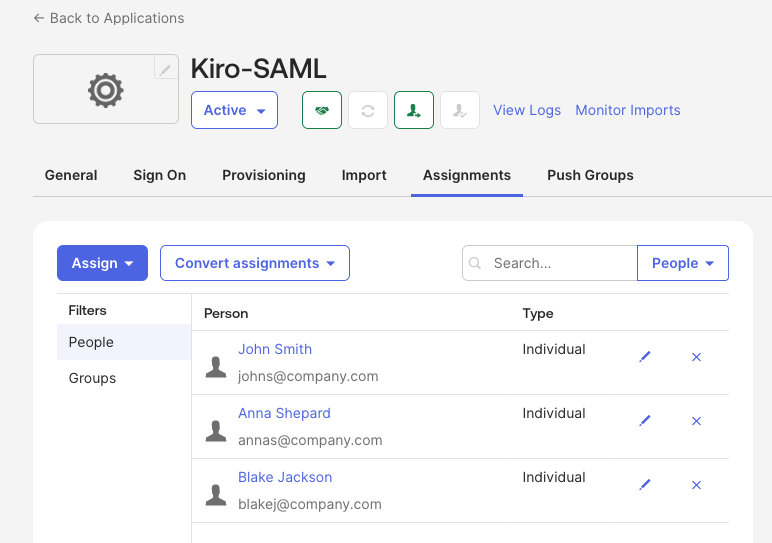
You have now completed all the steps required to configure an application in Okta, connect the application with a Kiro Profile, and add users/groups to the Profile.
Security considerations
Session management
- Kiro uses OIDC refresh tokens to maintain user sessions. When a session expires, the refresh token keeps the Kiro session alive independently until the refresh token itself expires.
- You cannot force-revoke active user sessions from the Kiro console. To remove access, you have to remove the user from the Okta application — access will be revoked at the next token refresh attempt.
- Removing users from the Kiro OIDC application will prevent users from logging in (Applications → Kiro OIDC application → Assignments) → Click on x next to user
Redirect URI security
- Add only the redirect URIs specified in this guide.
Profile deletion warning
If you delete a Kiro profile after provisioning and create a new profile with the same Okta application, group membership will not be synced. You must re-provision the application completely.
Preventing unauthorized access
- Do not add any user to the Kiro application in Okta.
- Verify the user is not a member of any group that is assigned to the Kiro application.
- After creating a group-based subscription, review the Subscriptions tab in the Kiro console to confirm that no unintended users received a subscription.
Removing a user and deprovisioning behavior
- Remove the user's assignment from your Kiro application in Okta. This blocks all future login attempts.
- Existing sessions remain active until the next token refresh is attempted, at which point access is revoked. Active sessions are not immediately terminated.
- Subscription removal is not automatic. After removing a user from the Okta application, you must also manually delete the user's subscription in the Kiro console to release the seat.
Group membership sync behavior
- Kiro relies entirely on push-based SCIM sync from Okta. Kiro cannot request a pull from Okta.
- Group membership changes are pushed to Kiro as they occur.
Troubleshooting
| Missed step | How will this manifest | How to fix | Notes |
|---|---|---|---|
| User was not added to the OIDC app | User will not be able to log in | Add the user to the OIDC application's Assignments tab | User must be in both OIDC and SAML applications |
| Did not enable provisioning to create users | Users are not synced to Kiro | In the SAML app, go to Provisioning > To App and enable "Create Users" | Also enable "Update User Attributes" |
Page updated: March 20, 2026
Connect your Okta IdP