Connecting Microsoft Entra ID to Kiro takes about 30–45 minutes. You'll create an Entra application, configure a Kiro profile in the AWS console, and set up SCIM provisioning so user and group assignments sync automatically.
Before you start, have these open:
- The Microsoft Entra admin center (requires Application Administrator or higher)
- The AWS Management Console with Kiro admin permissions
AWS access is only needed for the administrator managing the Kiro profile — end users don't need an AWS account.
The integration connects two systems:
- Microsoft Entra ID — manages identity. You define which users and groups can access Kiro here.
- Kiro profile (in the AWS console) — manages subscriptions and billing.
SCIM provisioning connects them: you provide a SCIM endpoint and token from Kiro to Entra, and the Application (client) ID and Directory (tenant) ID from Entra to Kiro.
Sign in to the Microsoft Entra admin center, then create a new application from Enterprise applications -> New application. In the Microsoft Entra App Gallery, select "Create your own application".
Loading image...
Set a descriptive name, for example, Kiro-Entra. Then, select the "Integrate any other application you don't find in the gallery (Non-gallery)" option for the "What are you looking to do with your application?" field, and select "Create" to create the application.
Loading image...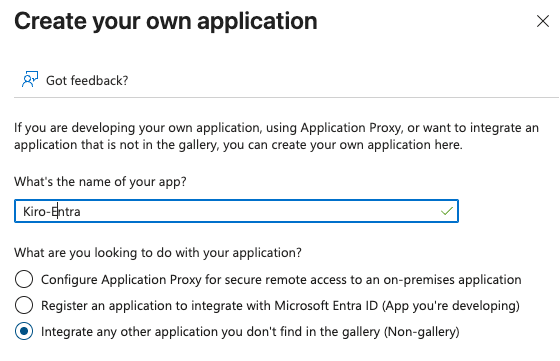
Configure the application so user identities can present the right authorization to access Kiro.
Kiro syncs user identities through the application's API endpoint. For the "Kiro-Entra" application (App registrations -> All applications -> Kiro-Entra), select "Expose an API", then select "Add" next to the "Application ID URI" field and save the default value. Next, add two scopes that define the permissions an identity must present to Kiro.
Loading image...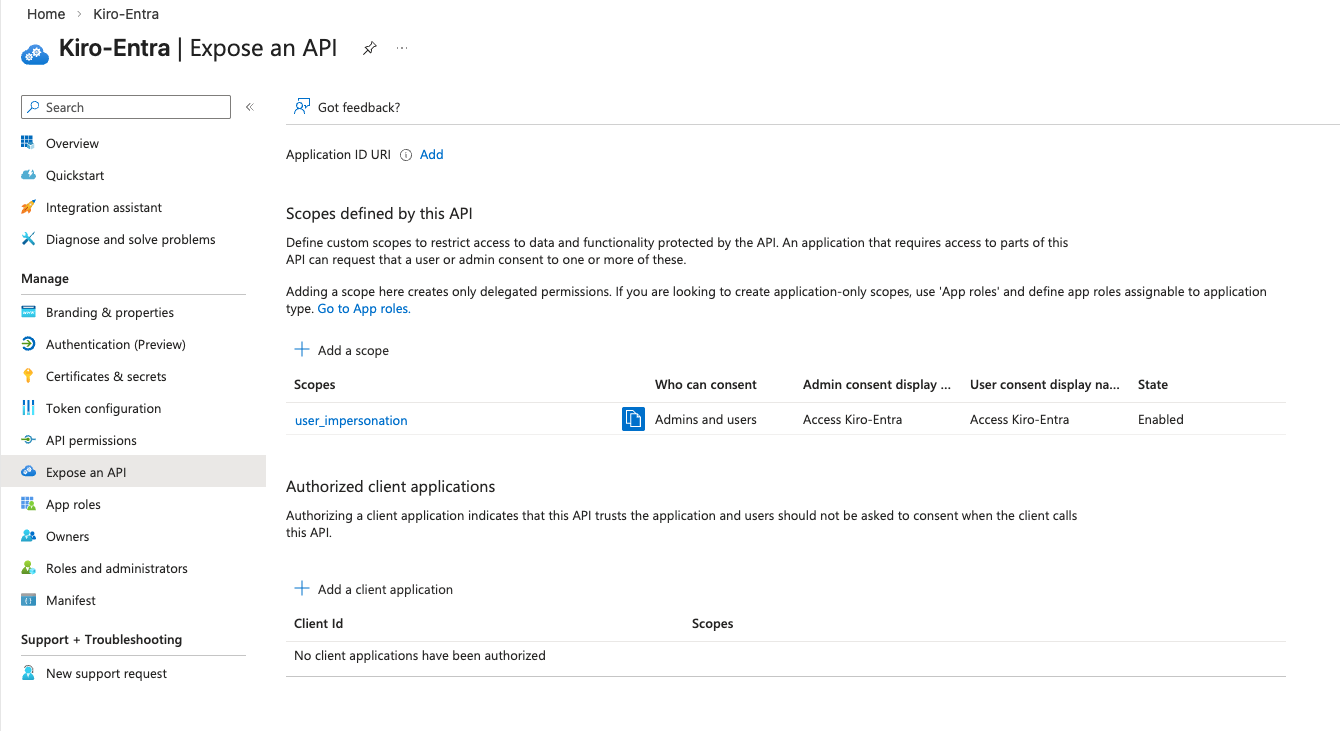
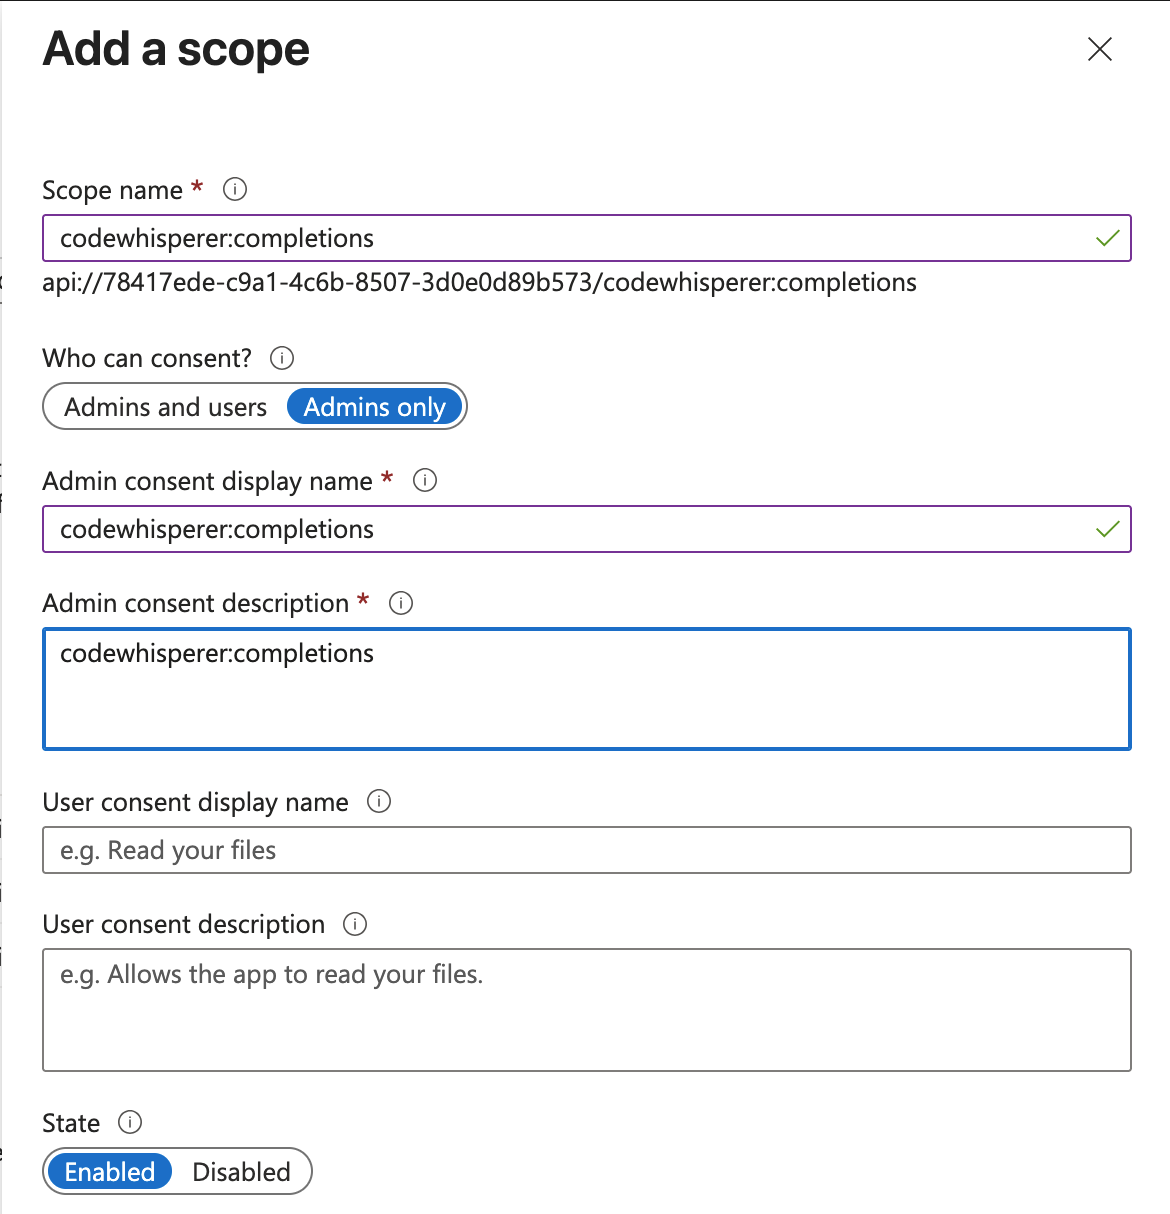
Add the first scope, which gives users access to inline code completion:
- Scope Name: codewhisperer:completions
- Who can consent?: Admins and Users
- Admin consent display name: codewhisperer:completions
- Admin consent description: codewhisperer:completions
- State: Enabled
Add the second scope, which gives users access to chat:
- Scope Name: codewhisperer:conversations
- Who can consent?: Admins and Users
- Admin consent display name: codewhisperer:conversations
- Admin consent description: codewhisperer:conversations
- State: Enabled
After you have completed adding the scopes, "Expose an API" page should look like this:
Loading image...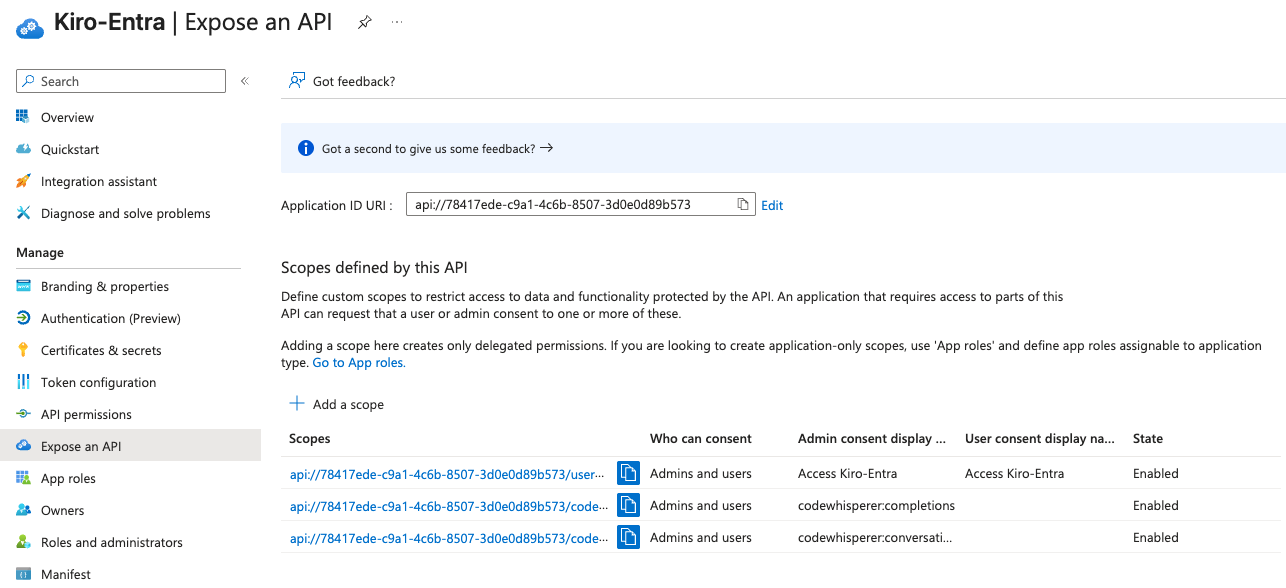
A redirect URI is where Entra sends the user and delivers tokens after authentication. For the Kiro application, select "Authentication (Preview)", then "Add Redirect URI", and choose the "Mobile and desktop application" platform.
Add two redirect URIs — "kiro://kiro.oauth/callback" and "http://localhost/oauth/callback" — selecting Configure after each.
After adding the redirect URIs, the page should look like this:
Loading image...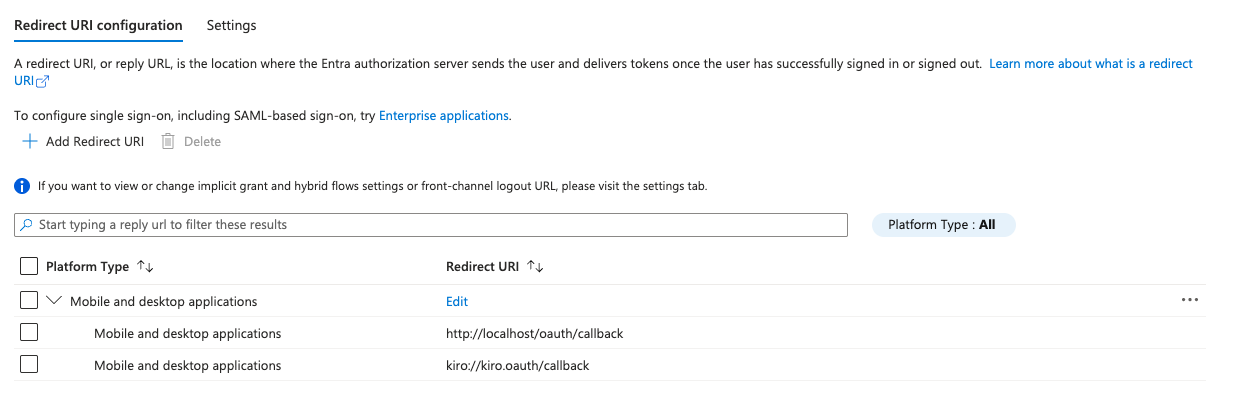
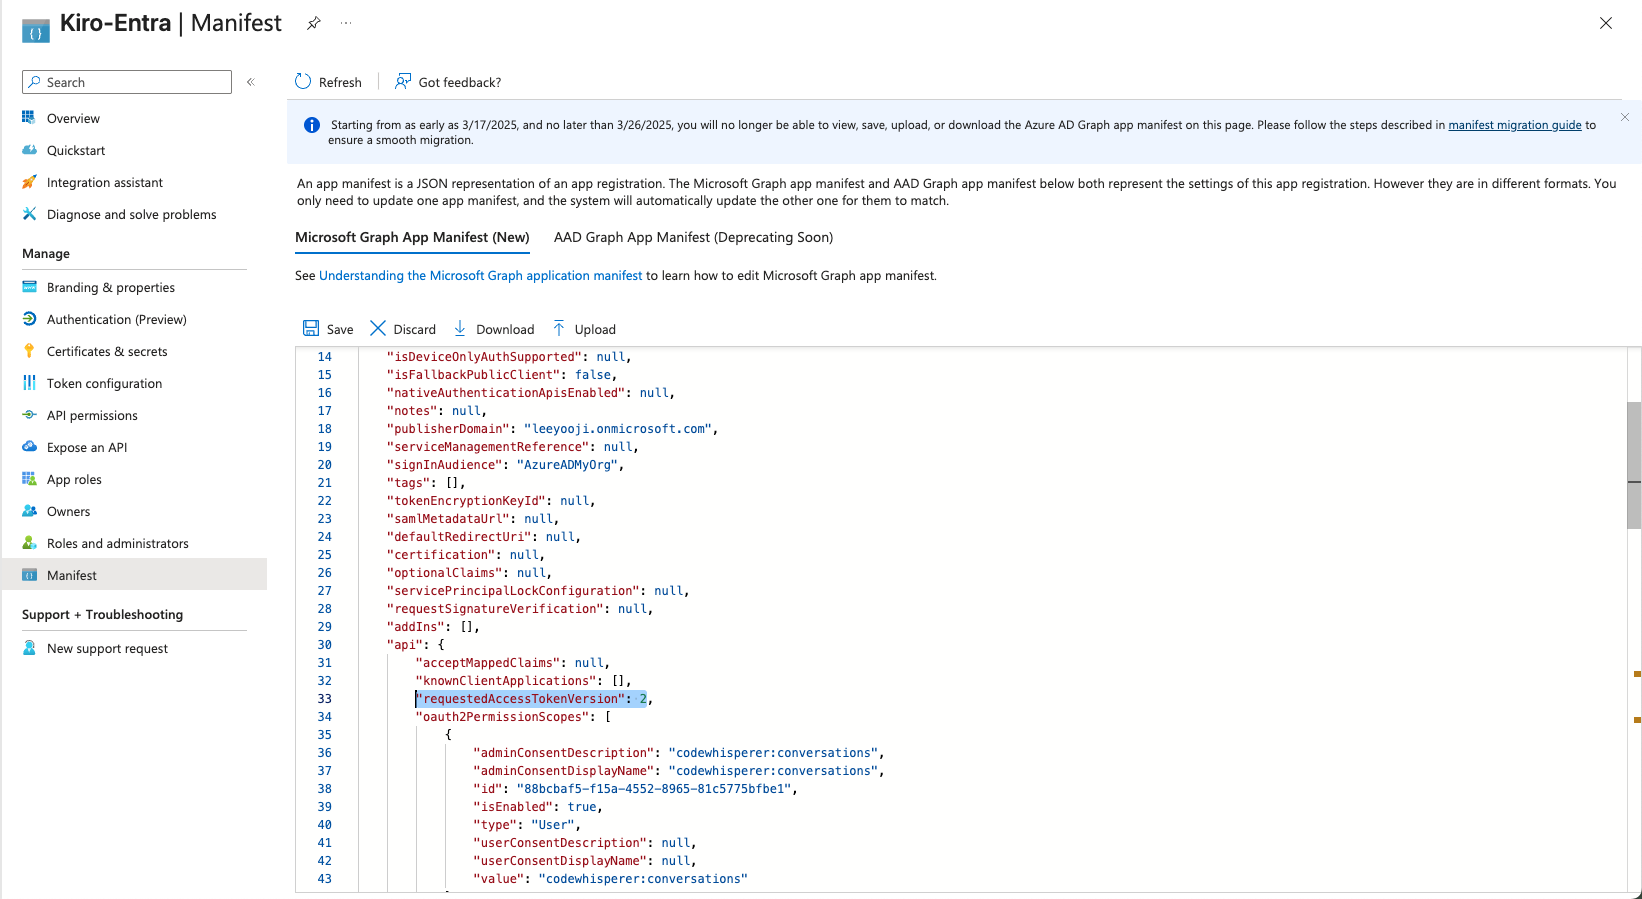
Last, set the access token format that Kiro will request. By default, Entra ID issues v1-format access tokens. Kiro requires v2-format tokens. In the App Registration, select Manifest from the left navigation. Find the requestedAccessTokenVersion field under the api section and set its value to 2. Select Save.
Now, you are ready to set up the Kiro profile.
Setting up the Kiro profile and connecting it to your Microsoft Entra ID IdP consists of two steps:
- Configure your Microsoft Entra ID application details in Kiro
- Add and verify your domain in Kiro
In the AWS Management Console, search for Kiro and open the Kiro service. Select Onboard your team to Kiro. In the Select your identity management source dialog, choose External Identity Provider to connect an existing external identity provider, then select Next.
Loading image...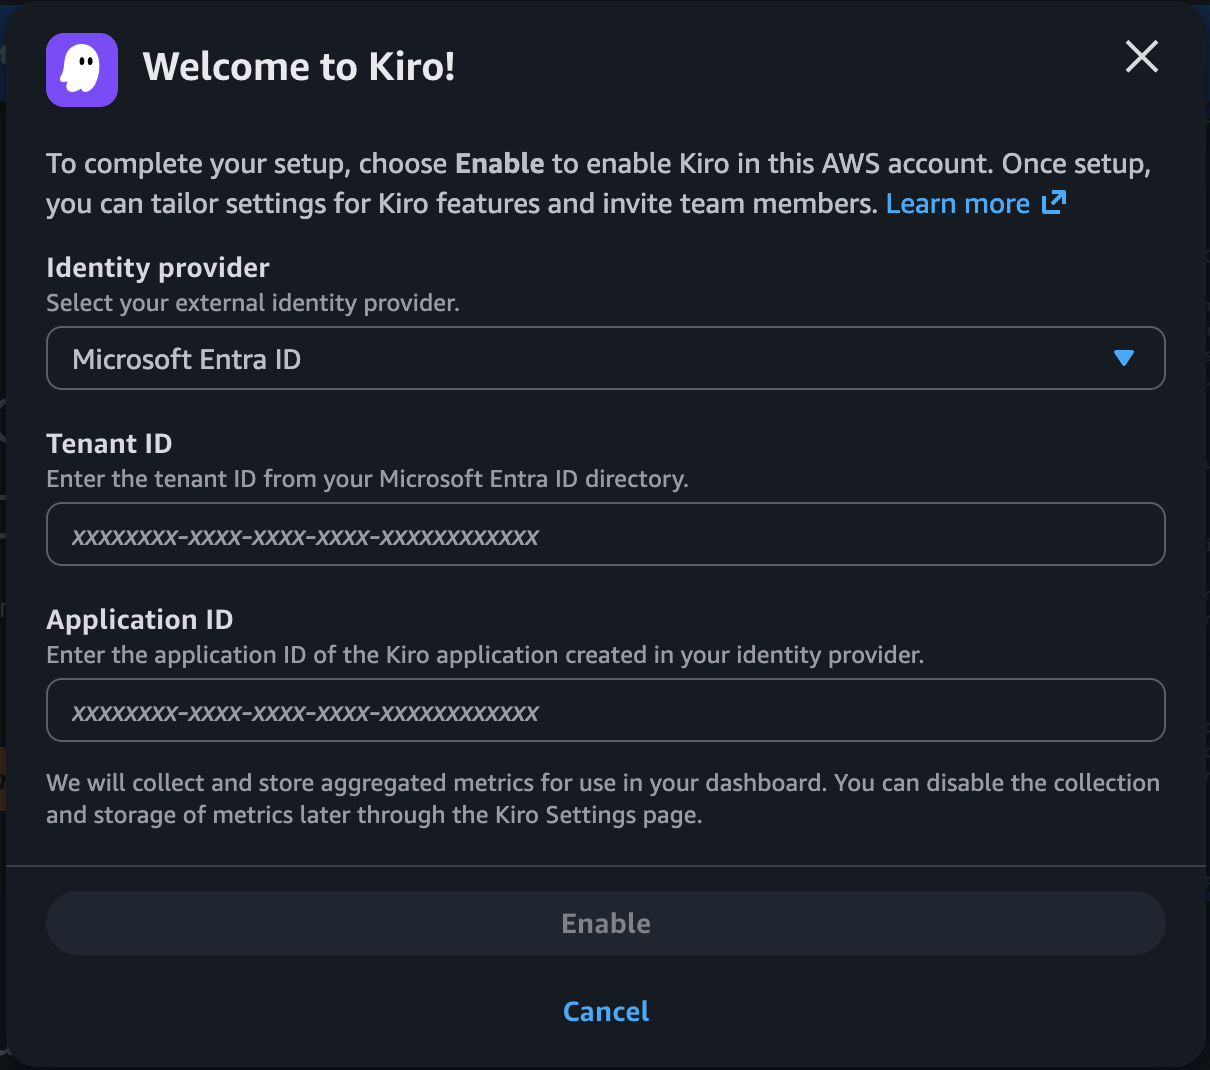
In the Welcome to Kiro! dialog, select an identity provider from the dropdown. The currently supported providers are Microsoft Entra ID and Okta. Choose Microsoft Entra ID. The dialog then shows Application ID and Tenant ID fields, which you'll fill in with values from your Entra application.
To find those values, go to Microsoft Entra and select App registrations -> All applications -> Kiro-Entra. This opens the "Overview" tab.
Loading image...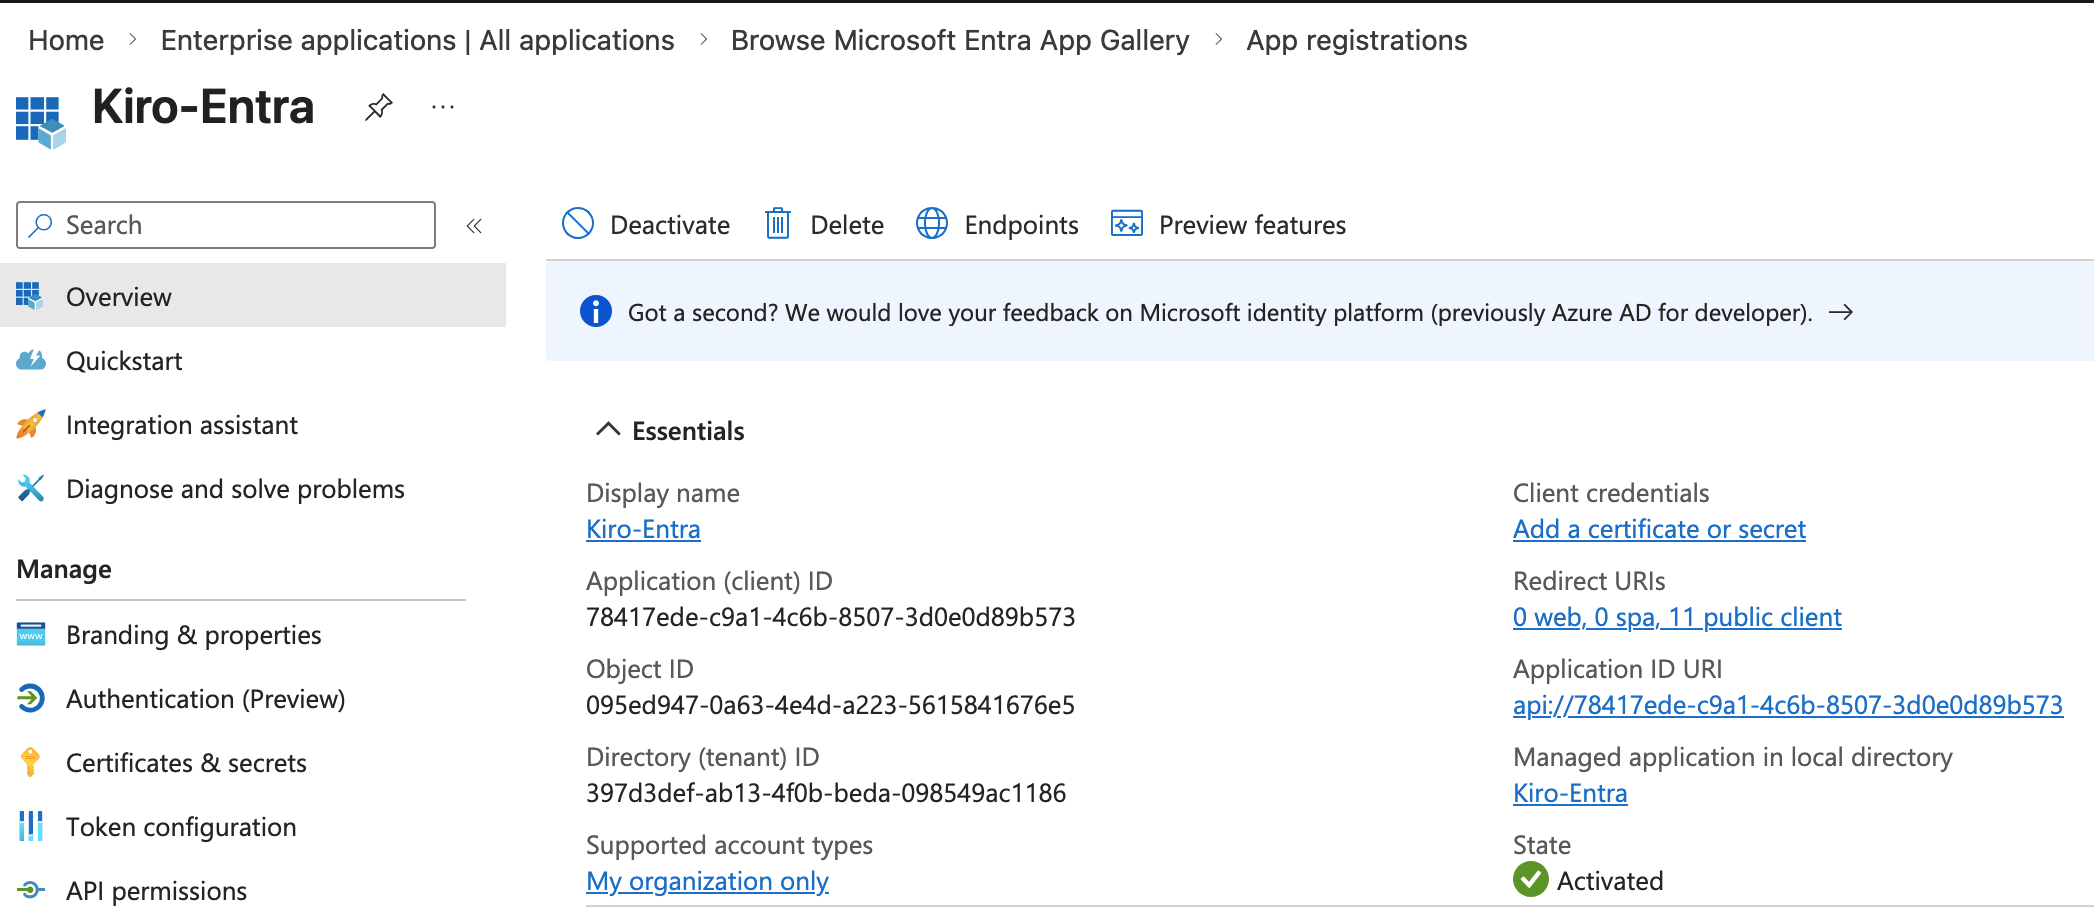
First, copy the Application (client) ID field value and paste it into the Application ID field in the Kiro profile you are creating. Copy the Directory (tenant) ID into the Tenant ID field in the Kiro profile, then select Enable to create the profile.
Select the "Settings" button and in the Identity management -> Domains section, select "Add domain" to add your company domain
Loading image...
Selecting "Add" will add the domain and show you a verification token. Copy the verification token. The domain added will show up in the Domains list with "Pending" status.
In your DNS Provider like Amazon Route53, create a TXT record with that verification token within 24 hours of adding the domain. Use a prefix such as kiro-app-1 for the record name (for example, kiro-app-1.yourdomain.com).
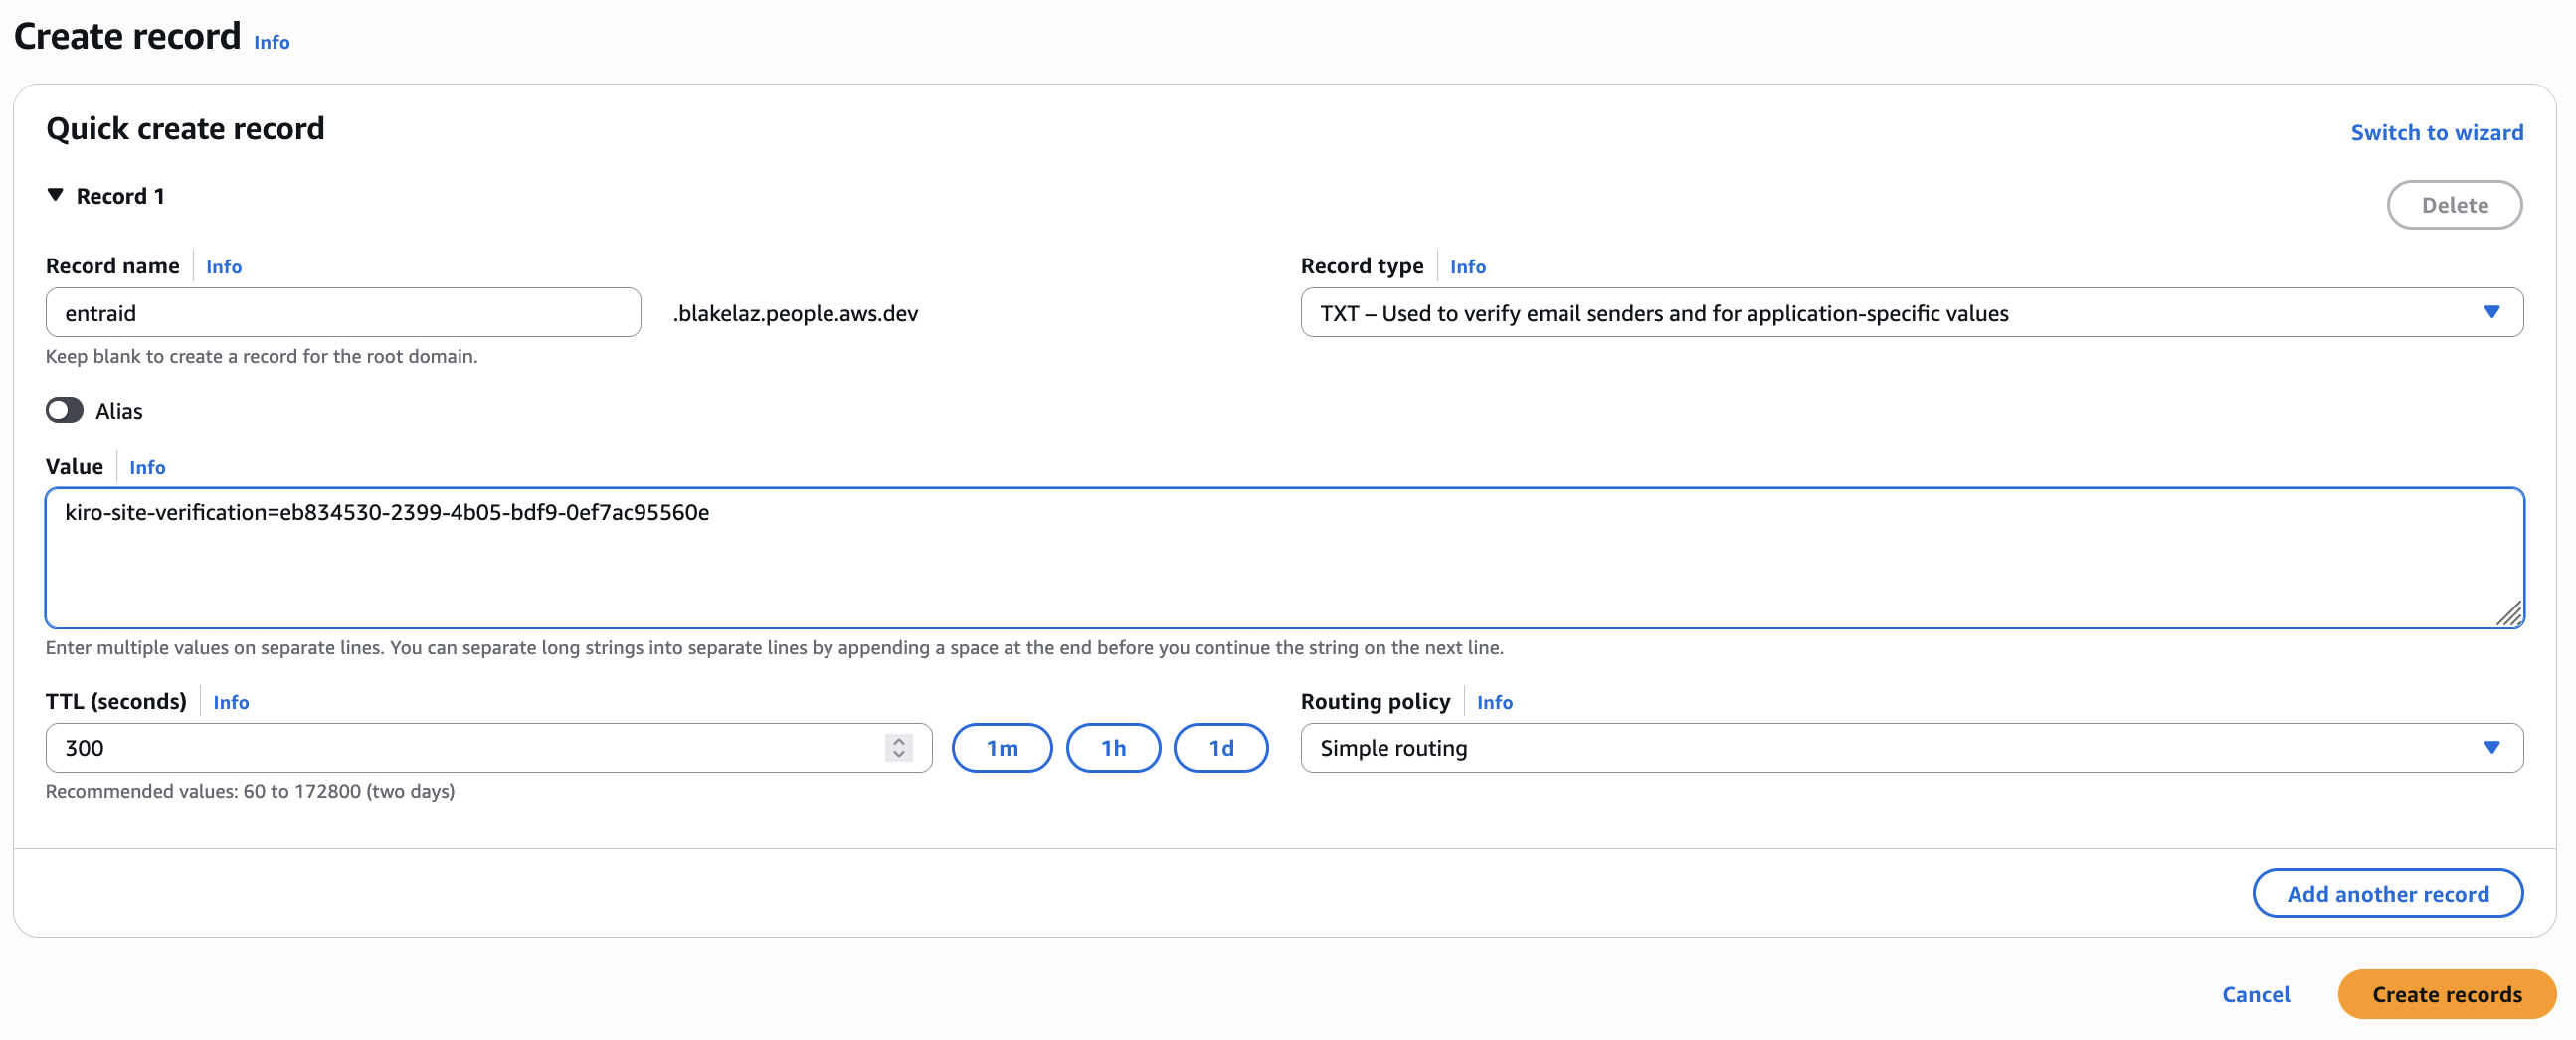
If the configuration is valid, after a few minutes the status will be "Verified".
Loading image...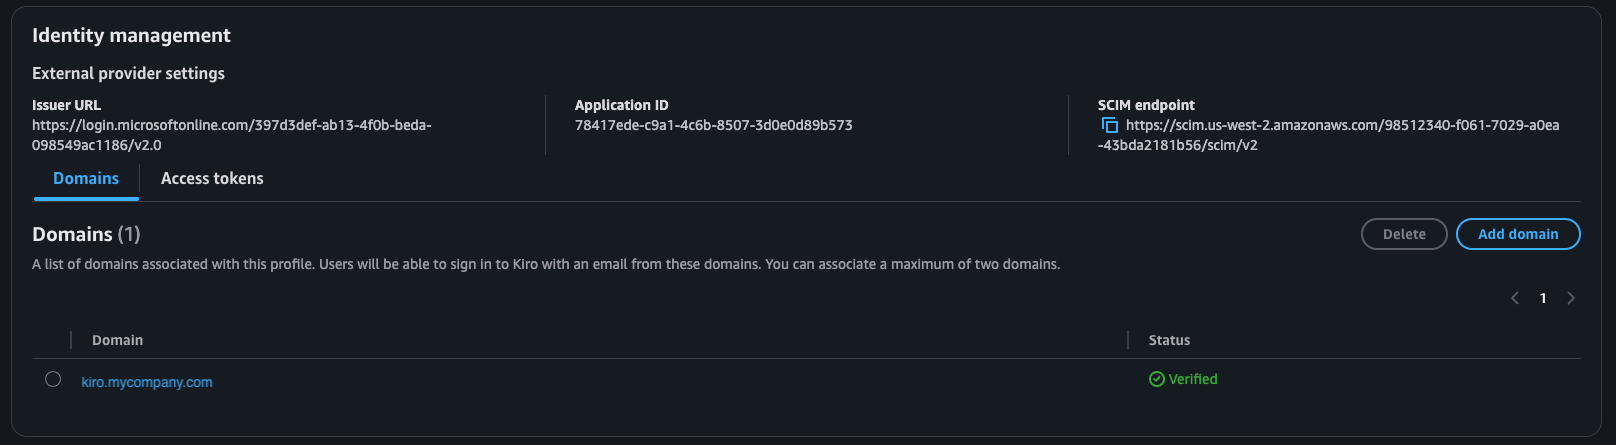
If your organization uses a private or internal domain for its infrastructure, use one of the following approaches:
- Verify a publicly resolvable domain or subdomain that you control. Add the TXT record to a domain (or subdomain) that resolves on public DNS, and verify that domain instead of the private one.
- Register the public domain your users sign in with. If your users sign in with email addresses on a public domain, add that public domain to the Kiro profile. When a user enters their email (with the public domain) and selects login, Kiro redirects them to the Entra ID login page — regardless of your internal infrastructure domain.
In this step, you will provision the Kiro application and verify that Kiro can sync identities from your Entra ID identity store.
In the Kiro console — Navigate to Settings → Identity Management. In the Access Tokens section, select Generate Token and copy the token value, then copy the SCIM Endpoint URL from the same page.
Loading image...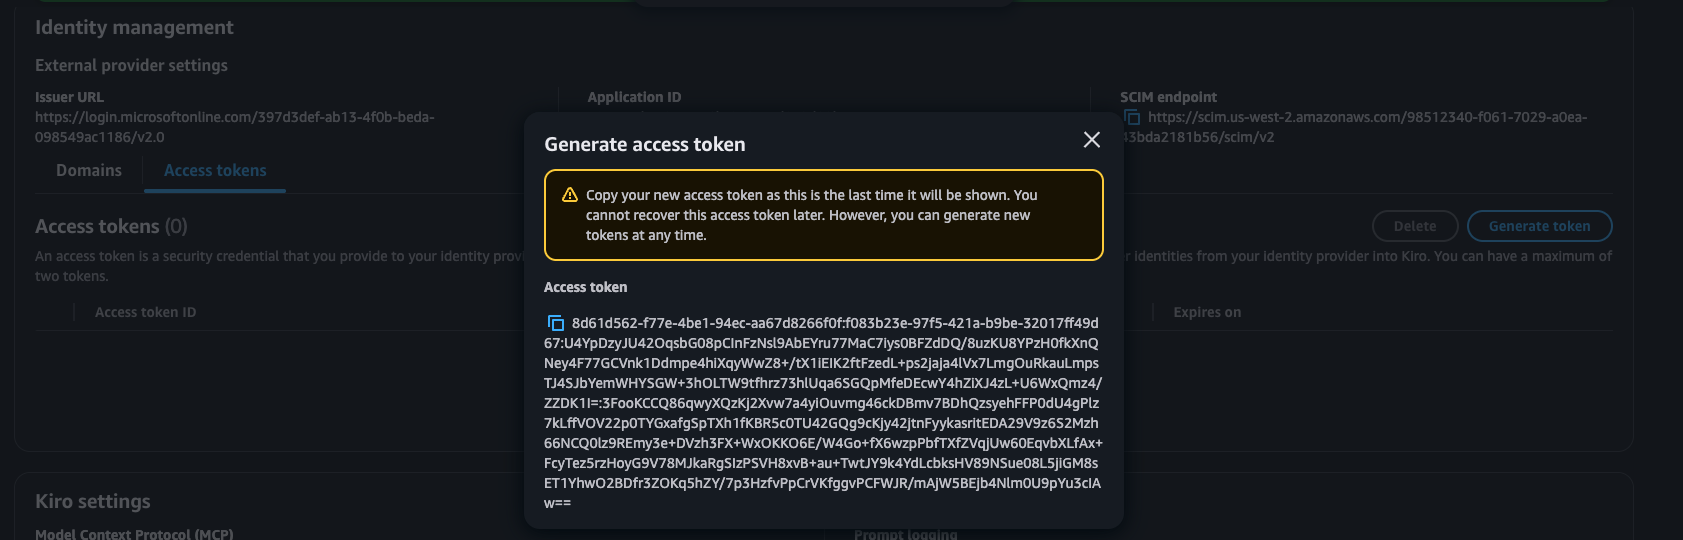
In the Entra admin center — Navigate to Enterprise Apps → Kiro-Entra → Provisioning. Select the Provisioning link from the sidebar, then set Provisioning Mode to Automatic.
- Paste the SCIM endpoint into the Tenant URL field
- Paste the access token into the Secret Token field
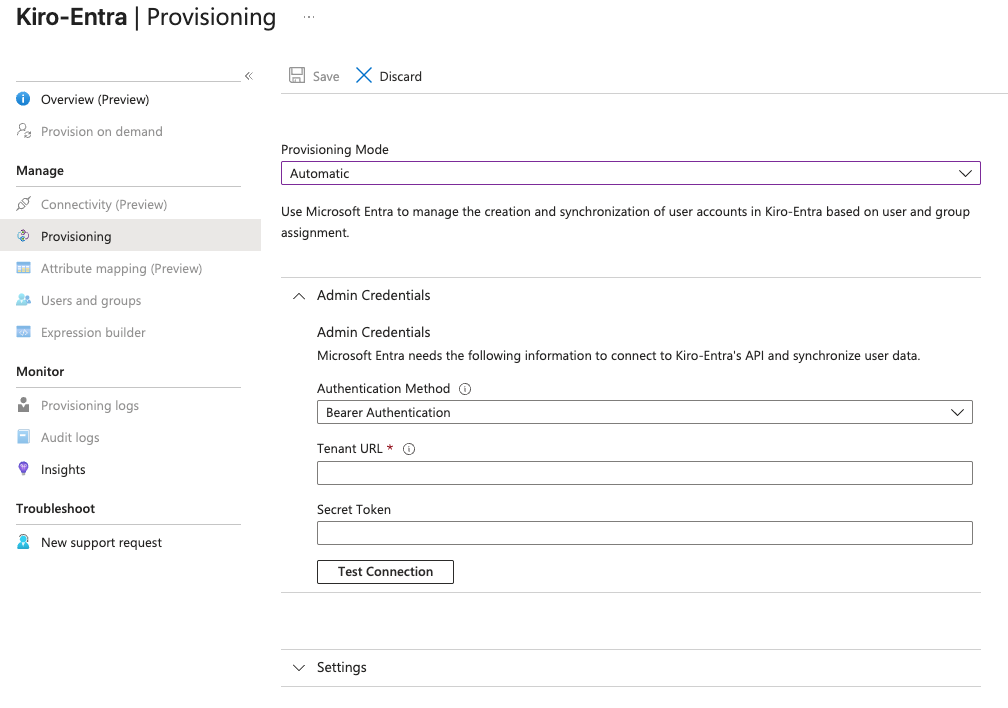
Select Test Connection to validate. If successful, select Save. If a Provisioning Status toggle is present, set it to On.
Loading image...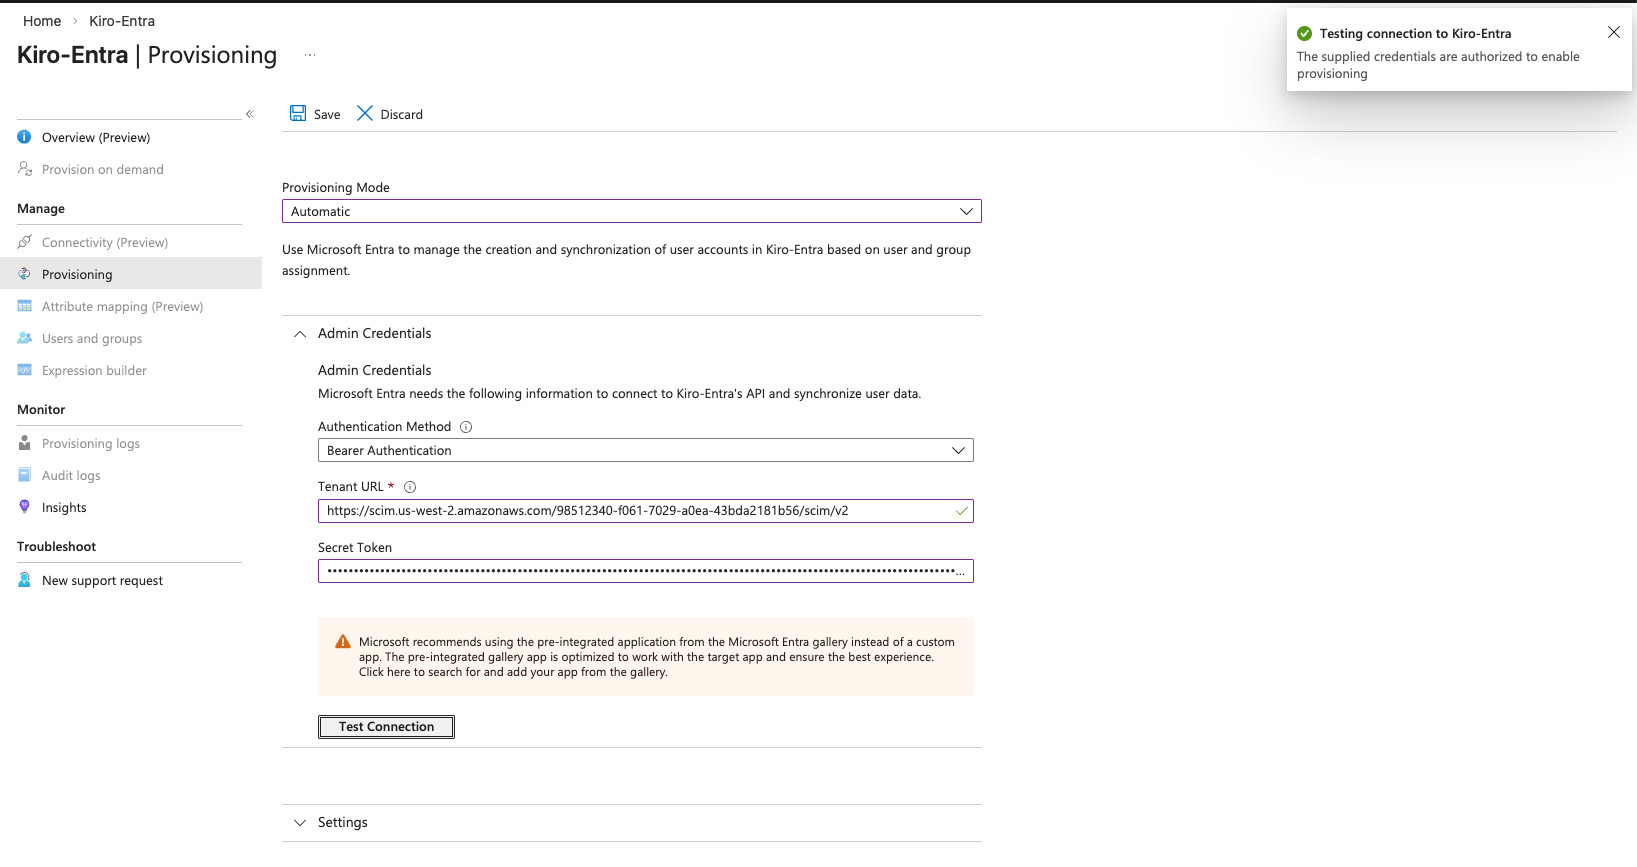 Loading image...
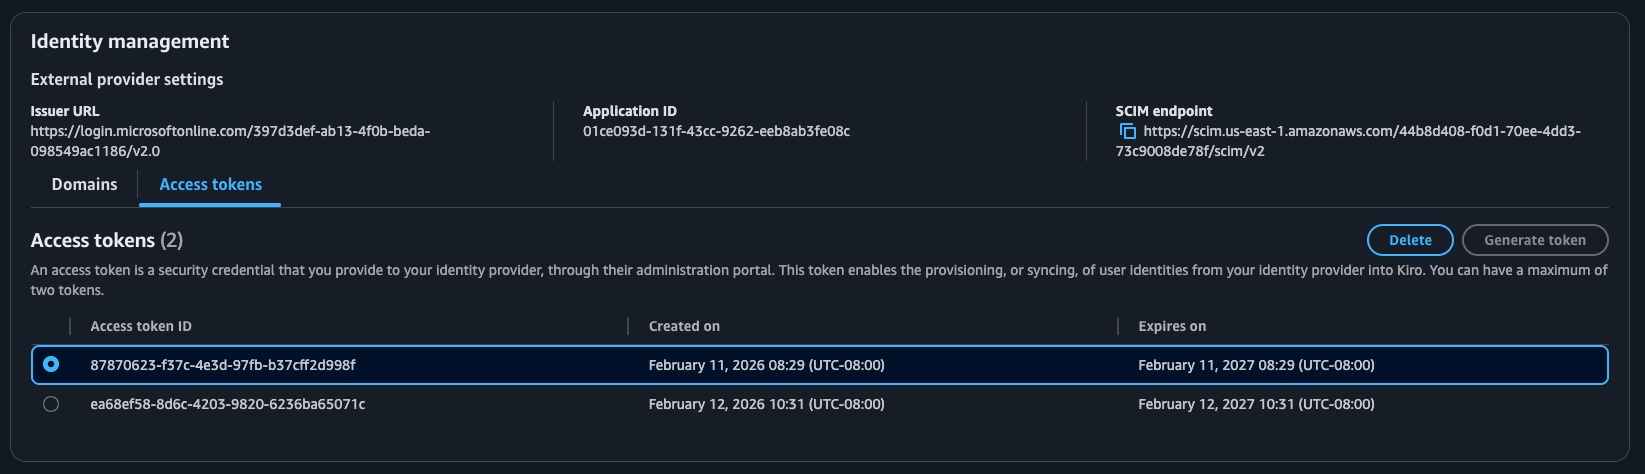
After saving, refresh the Entra ID application page — the attribute mapping links will not appear until you do.
With the sidebar links enabled, open the "Attribute mapping (Preview)" section. Both Provision Groups and Provision Users should be enabled.
Loading image...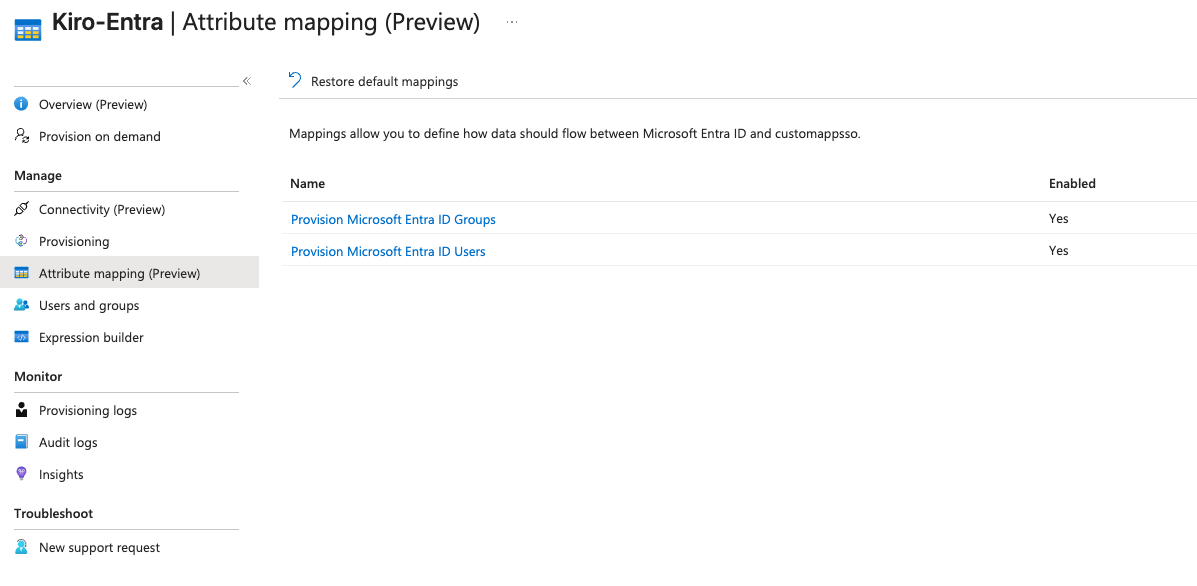
Select the "Provision Microsoft Entra ID Users" link to open the "Attribute Mapping" page. Select the "Edit" button for the "externalId" attribute to open the "Edit Attribute" page. Set the Source attribute value to "objectId" and save the configuration. "objectId" uniquely identifies a user or group and doesn't change, making it easy for Kiro to identify and synchronize users/groups.
Loading image...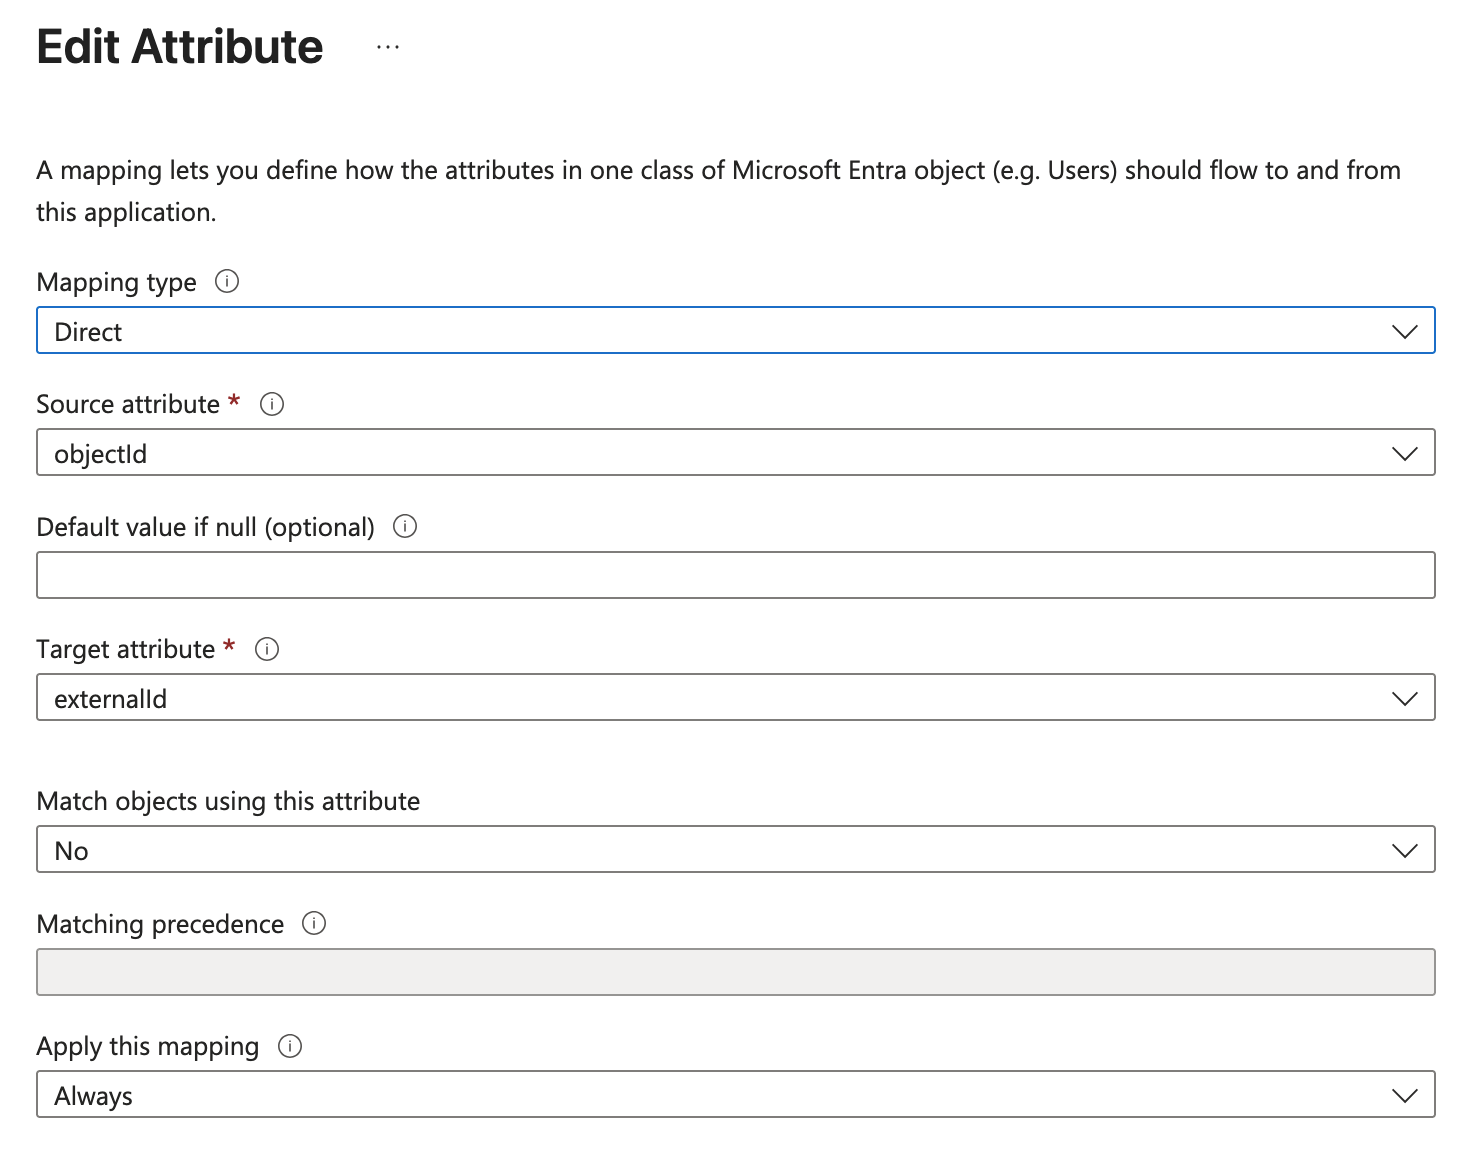
Entra auto-populates several attributes Kiro's SCIM endpoint does not support. If left in place, provisioning will fail. Delete the following from the attribute mapping table:
Enterprise User Extension attributes (delete these):
urn:ietf:params:scim:schemas:extension:enterprise:2.0:User:employeeNumberurn:ietf:params:scim:schemas:extension:enterprise:2.0:User:departmenturn:ietf:params:scim:schemas:extension:enterprise:2.0:User:manager
Phone number attributes (delete these):
phoneNumbers[type eq "work"].valuephoneNumbers[type eq "mobile"].valuephoneNumbers[type eq "fax"].value
Select each attribute row and choose Delete. Save the mapping when done.
Choose which users and groups to synchronize from the Entra application to Kiro. The selected users and groups become available to associate with a Kiro subscription in the Kiro profile.
In the Entra admin center, navigate to your Kiro application → Users and groups → select + Add user/group. Assign the groups (or individual users) that should have access to Kiro.
To view users and groups automatically provisioned, navigate to the "Users and groups" section in the Entra ID application. It may take some time for users and groups to appear on their own. Refer to Entra documentation for tracking the progress of the provisioning process.
To manually provision, navigate to "Provisioning" page and select "Provision On Demand" under "Quick Actions" section.
Loading image...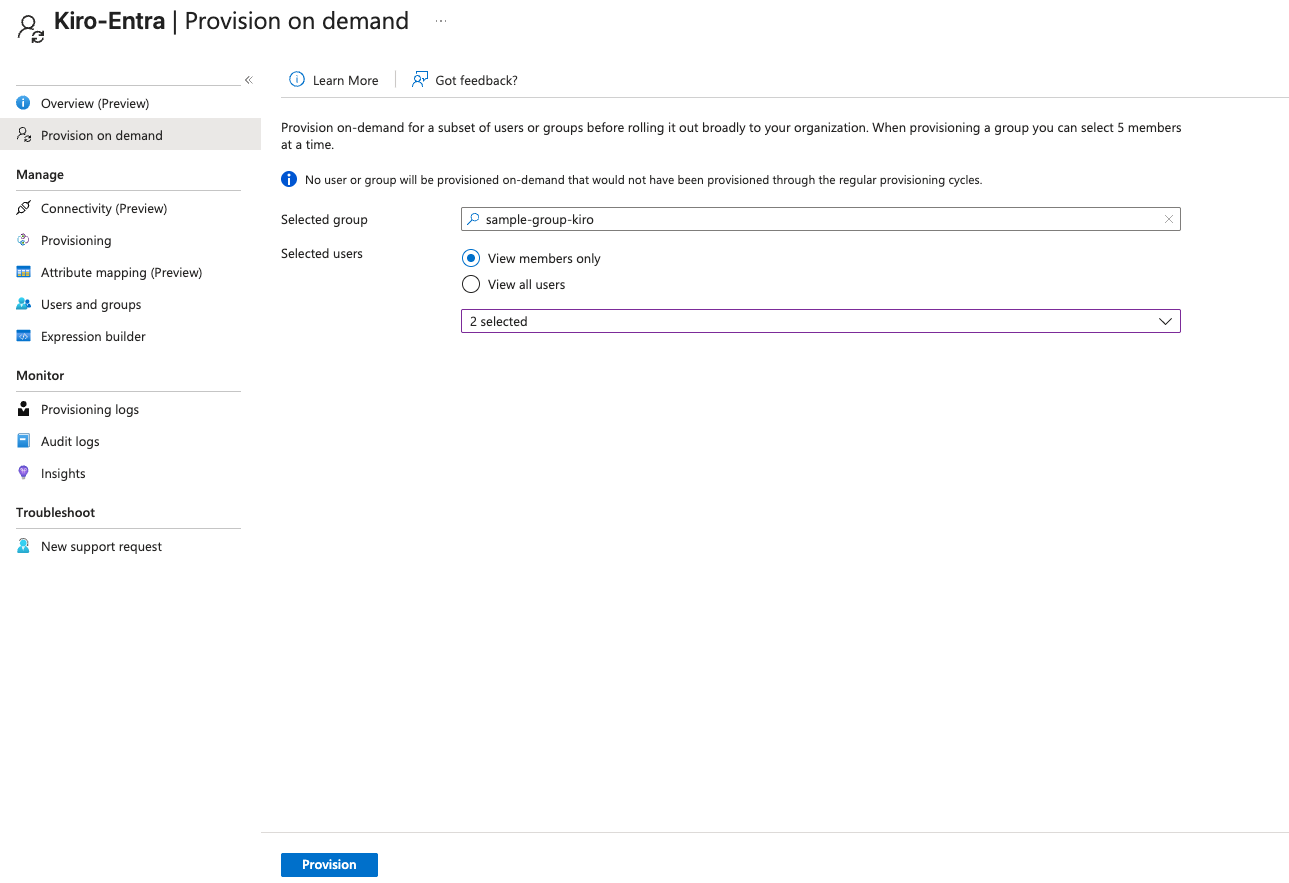
If you are provisioning a group, make sure you select all the users in the group. After you have successfully configured the group and the users in the group, you will see a success screen.
Loading image...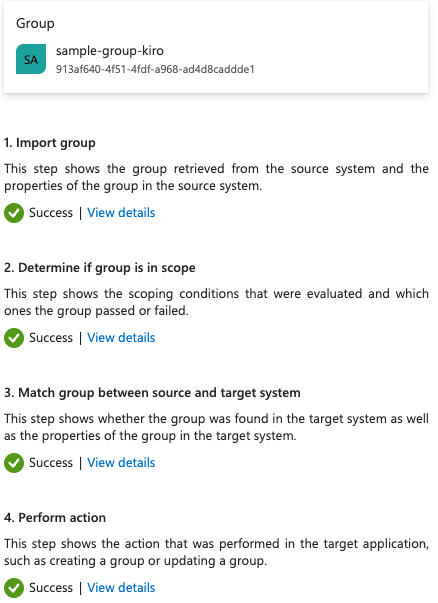
Repeat the steps to add all the users and groups you want to synchronize with Kiro.
You have completed all configuration steps for Microsoft Entra ID.
When users appear in your Kiro console, follow the subscription guide to activate them.
Session management
- Kiro uses OIDC refresh tokens to maintain user sessions. When a session expires, the refresh token keeps the Kiro session alive independently until the refresh token itself expires.
- You cannot force-revoke active user sessions from the Kiro console. To remove access, you have to remove the user from the Entra application — access will be revoked at the next token refresh attempt.
- Go to Enterprise apps > your application > Users and Groups. Select the user, then remove assignment
Redirect URI security
- Add only the redirect URIs specified in this guide.
Profile deletion warning
If you delete a Kiro profile after provisioning and create a new profile with the same Entra application, group membership will not be synced. You must re-provision the application completely.
Preventing unauthorized access
- Do not add any user to the Kiro application in Entra.
- Verify the user is not a member of any group that is assigned to the Kiro application.
- After creating a group-based subscription, review the Subscriptions tab in the Kiro console to confirm that no unintended users received a subscription.
Removing a user and deprovisioning behavior
- Remove the user's assignment from your Kiro application in Entra. This blocks all future login attempts.
- Existing sessions remain active until the next token refresh is attempted, at which point access is revoked. Active sessions are not immediately terminated.
- Subscription removal is not automatic. After removing a user from the Entra application, you must also manually delete the user's subscription in the Kiro console to release the seat.
Group membership sync behavior
- Kiro relies entirely on push-based SCIM sync from Entra. Kiro cannot request a pull from Entra.
- Group membership changes are pushed approximately every 40 minutes. Admins can trigger an immediate sync by using "Provision on Demand" in the Entra console.
- SCIM provisioning triggers on any user or group update in Entra — not just new additions. Edits to existing users or groups will also push a sync.
| Missed step | How will this manifest | How to fix | Notes |
|---|---|---|---|
| Did not set access token version to 2 in manifest | After login, API calls will fail with authorization errors | In App registrations, edit the Manifest and set api.requestedAccessTokenVersion to 2 | Entra defaults to v1 access tokens; Kiro requires v2 |
| Did not set scopes in Expose an API | Login screen will show an error | Add codewhisperer:completions and codewhisperer:conversations scopes in Expose an API | Both scopes are required |
| Did not set attribute mapping in provisioning | After login, user would not have a subscription (API calls fail) | In Attribute Mapping, set externalId source attribute to objectId. Delete ALL subscriptions and re-provision. | objectId is the stable unique identifier |
| Did not set redirect URIs | Login attempts show an error screen | Add the required localhost redirect URIs in Authentication settings | See the setup guide for the full list of ports |
| Did not provision on demand | Users/groups do not appear in the Kiro console | Navigate to Provisioning and select "Provision on Demand" | Automatic sync can take up to 40 minutes |
| Deleted profile after provisioning, created new profile with same app | Group membership is not synced | Re-provision the application from scratch with a new SCIM token | See Profile deletion warning above |
| Used a private or internal TLD for domain verification | Domain stays in "Pending" status and never verifies | Verify a publicly resolvable domain or subdomain instead, or register the public email domain your users sign in with | Verification performs a public DNS lookup; private TLDs return NXDOMAIN |
- Subscribe team members — Activate users after provisioning
- IAM permissions — Required AWS permissions for profile management
- Microsoft Entra provisioning documentation — Track provisioning progress
Connect your Microsoft Entra ID IdP